Customer & Vendor
This entry deals with the Customers & Vendors of the FPOs and it gives two option to the user.
These options (screen option) are as follows;
a. Customers
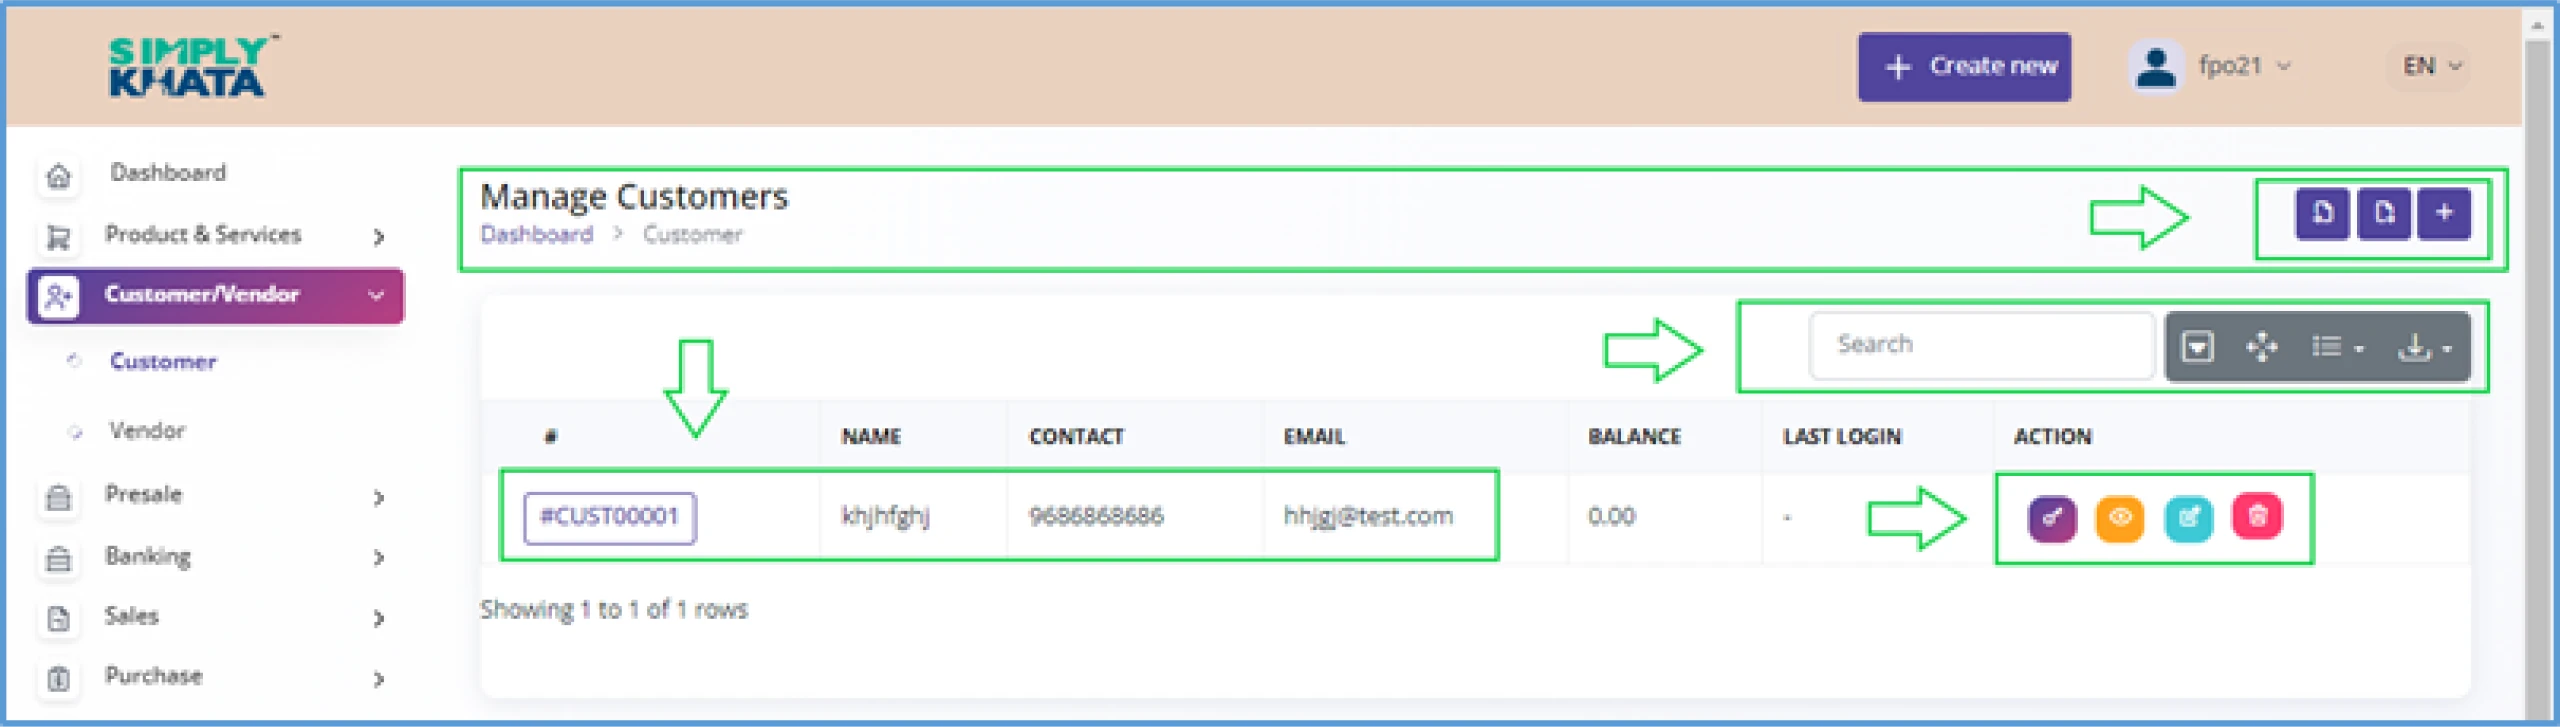
This screen gives Customer view and management to the user.
On this page user has three functions, which are as follows;
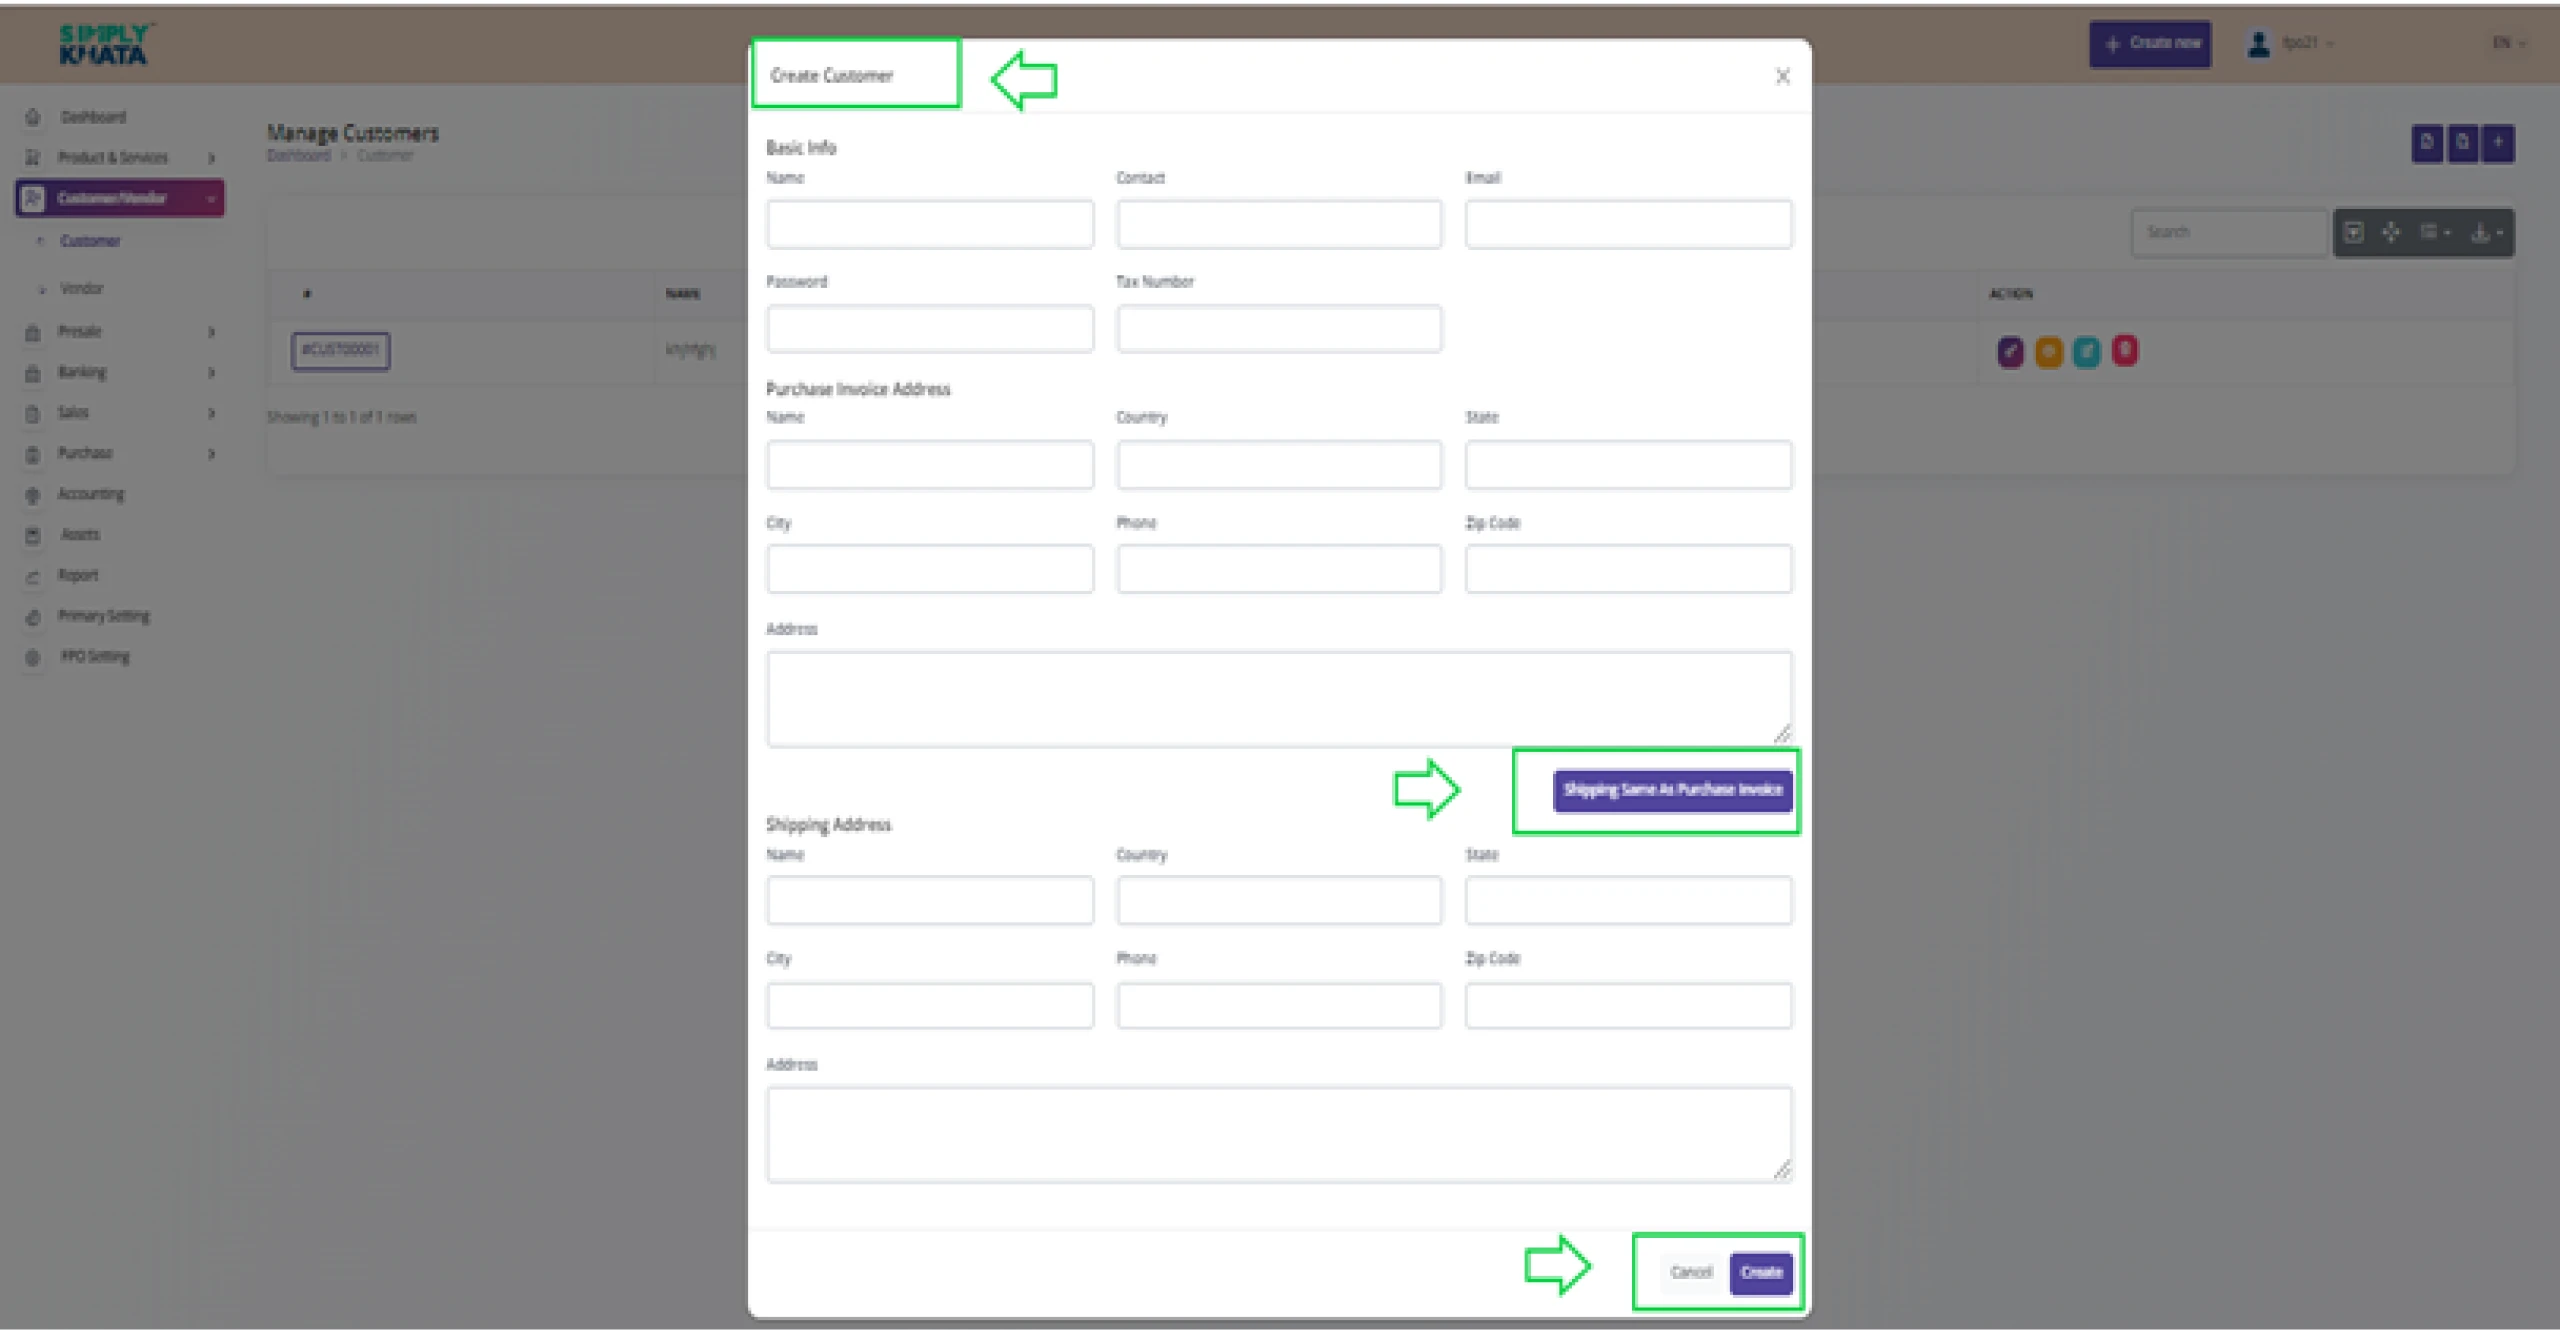
- Create Customer
Click on the small Plus Button as indicated in the Image 28 and provide
relevant basic information like as per Image- 29>
- Name > Name of the Customer {Mandatory}
- Contact > Contact Number of the Customer {Mandatory} (In Numeric)
- Email > Valid Email ID of the Customer {Mandatory} (as per format)
- Password > Valid Password for the Customer {Mandatory} (minimum 8 Character)
- Tax Number > Valid Tax (PAN/GST) the Customer {Mandatory} (as per format)
6. Purchase Invoice Address
- Name > of the Customer { Mandatory }
- Country > of the Customer { Mandatory } ( India in domestics and Others in exports)
- State > of the Customer { Mandatory } ( As country)
- City > of the Customer { Mandatory }
- Phone > of the Customer { Mandatory } ( Valid 10 Digit Phone Number)
- Zip Code > Name of the Customer { Mandatory } ( Valid 6 digit PIN code)
- Address > Address of the Customer { Mandatory }
7. Shipping Address (Click Button If “Shipping address” is same as “Purchase Invoice address”, Fill if different)
- Name > Just Like above
- Country > Just Like above
- State > Just Like above
- City > Just Like above
- Phone > Just Like above
- Zip Code > Just Like above
- Address > Just Like above
After entering the information as suggested above, click create Button at
the bottom of the page. This action will save the Customer for system and
transaction us
- Search Customer in table
With this option, the user can search the customer as per name, contact
number and Email ID category from the table as per image-28. This option
gives uses the list of all the customers in a downloadable format like excel or
CSV
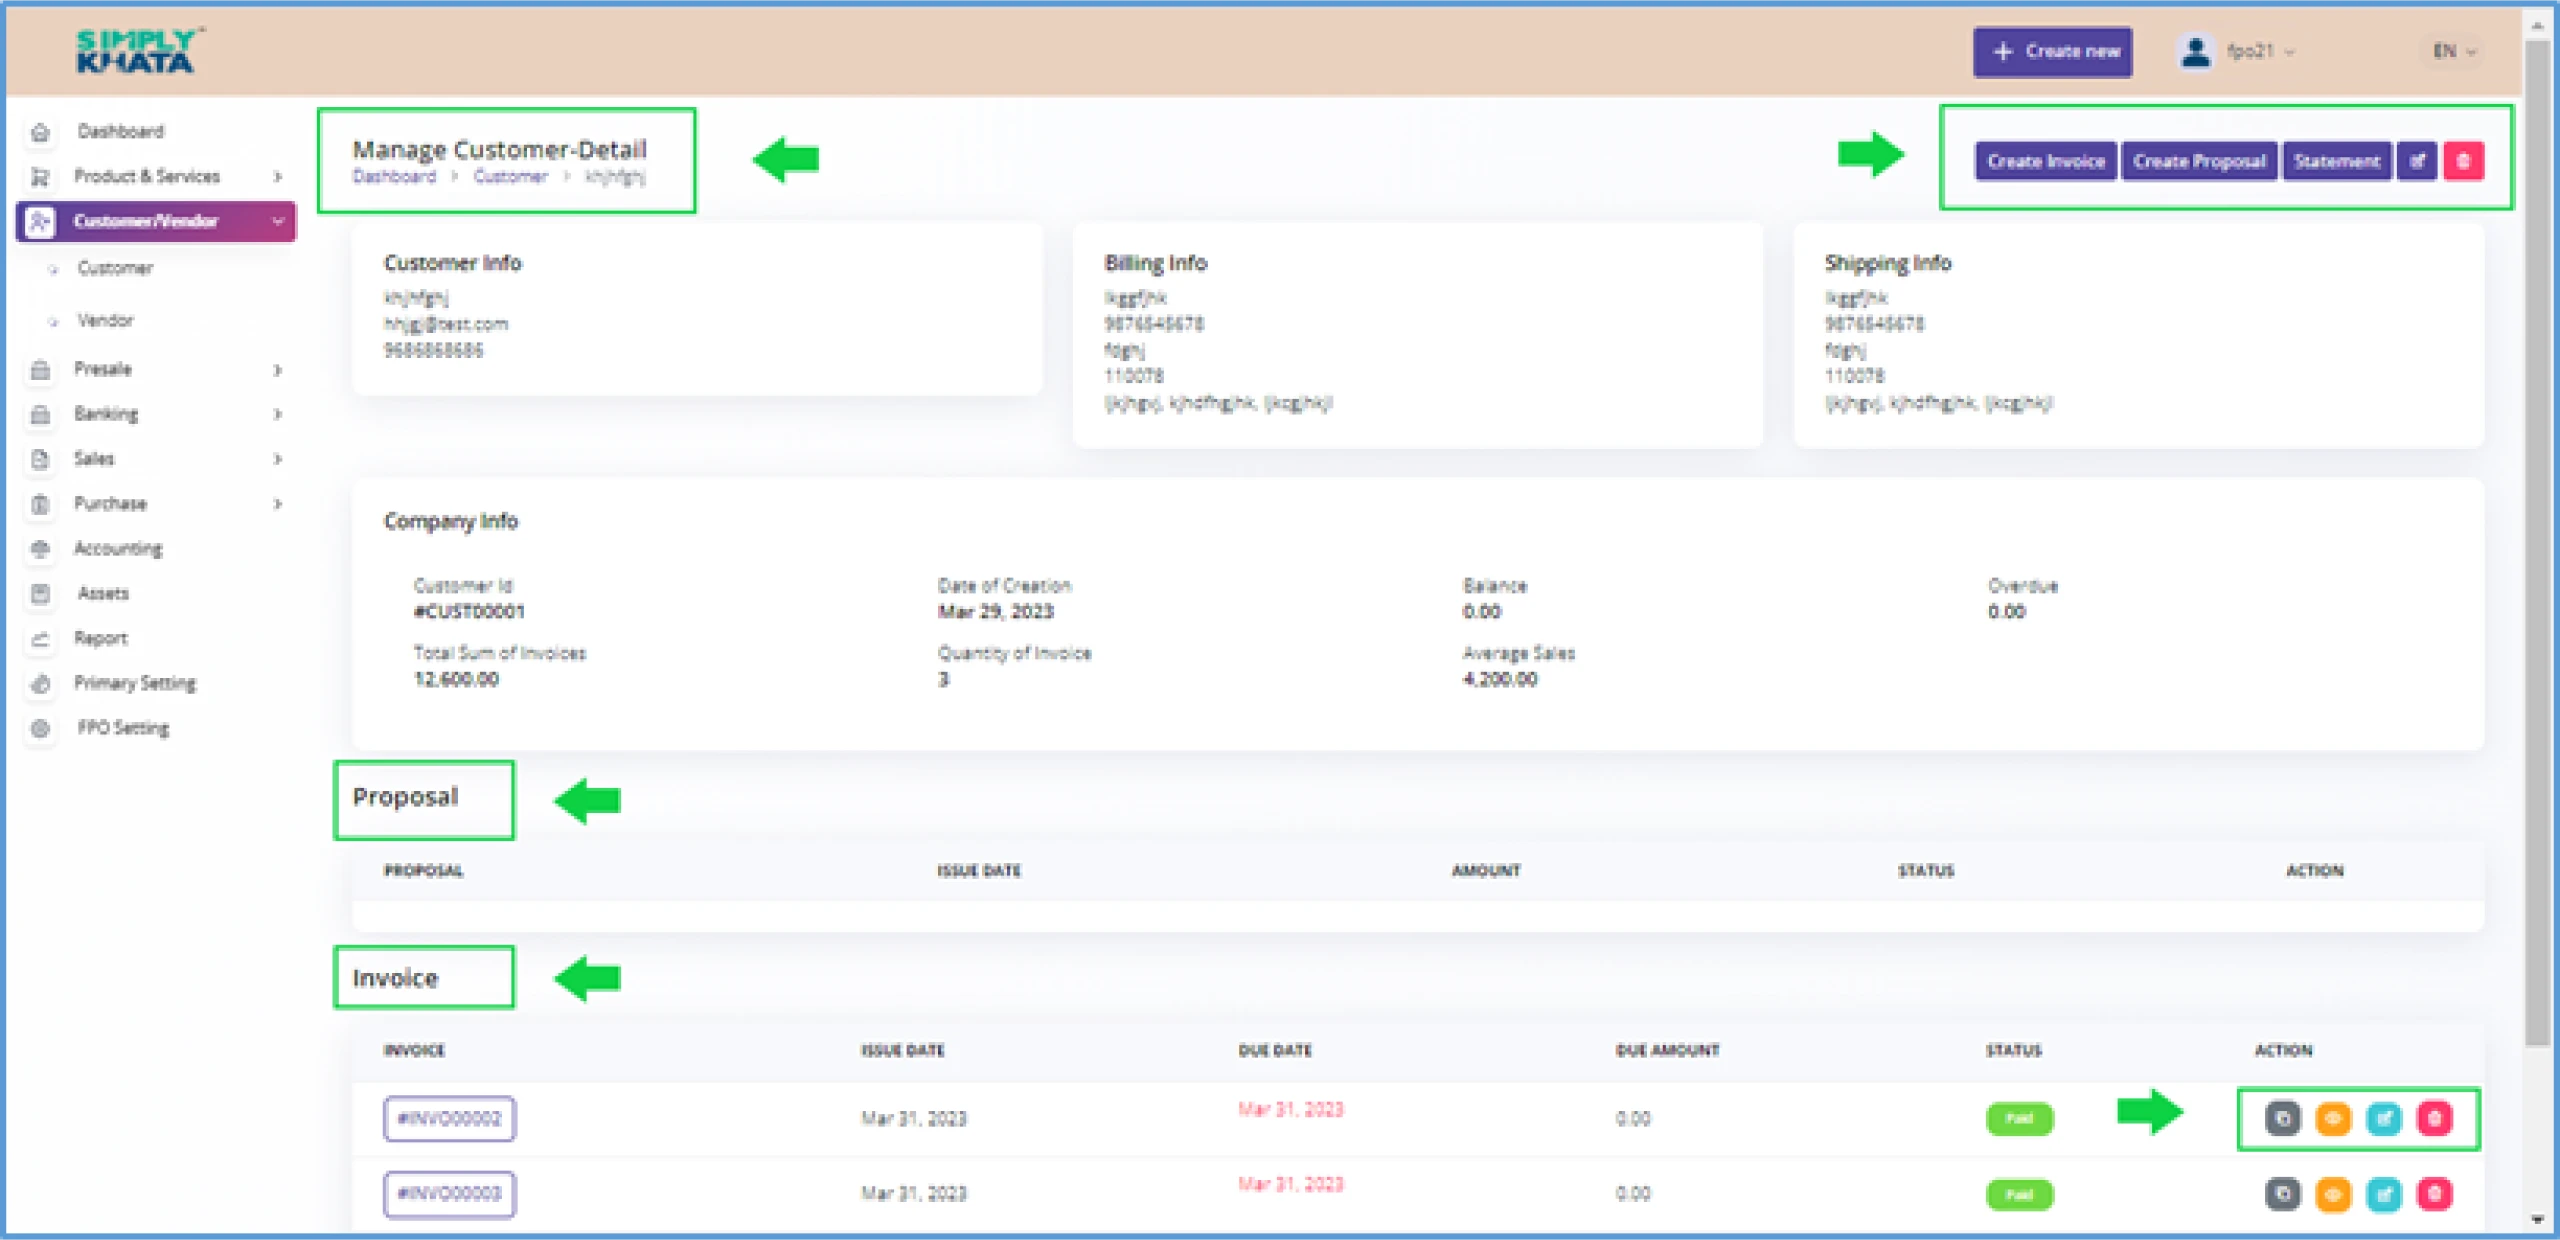
- View, manage and Delete Customers (By Clicking the Customer ID)
In the Customer table, User can;
-
View the customer Page
(by Clicking Small Eye Icon an new customer detail page opens)
(Image-31)
-
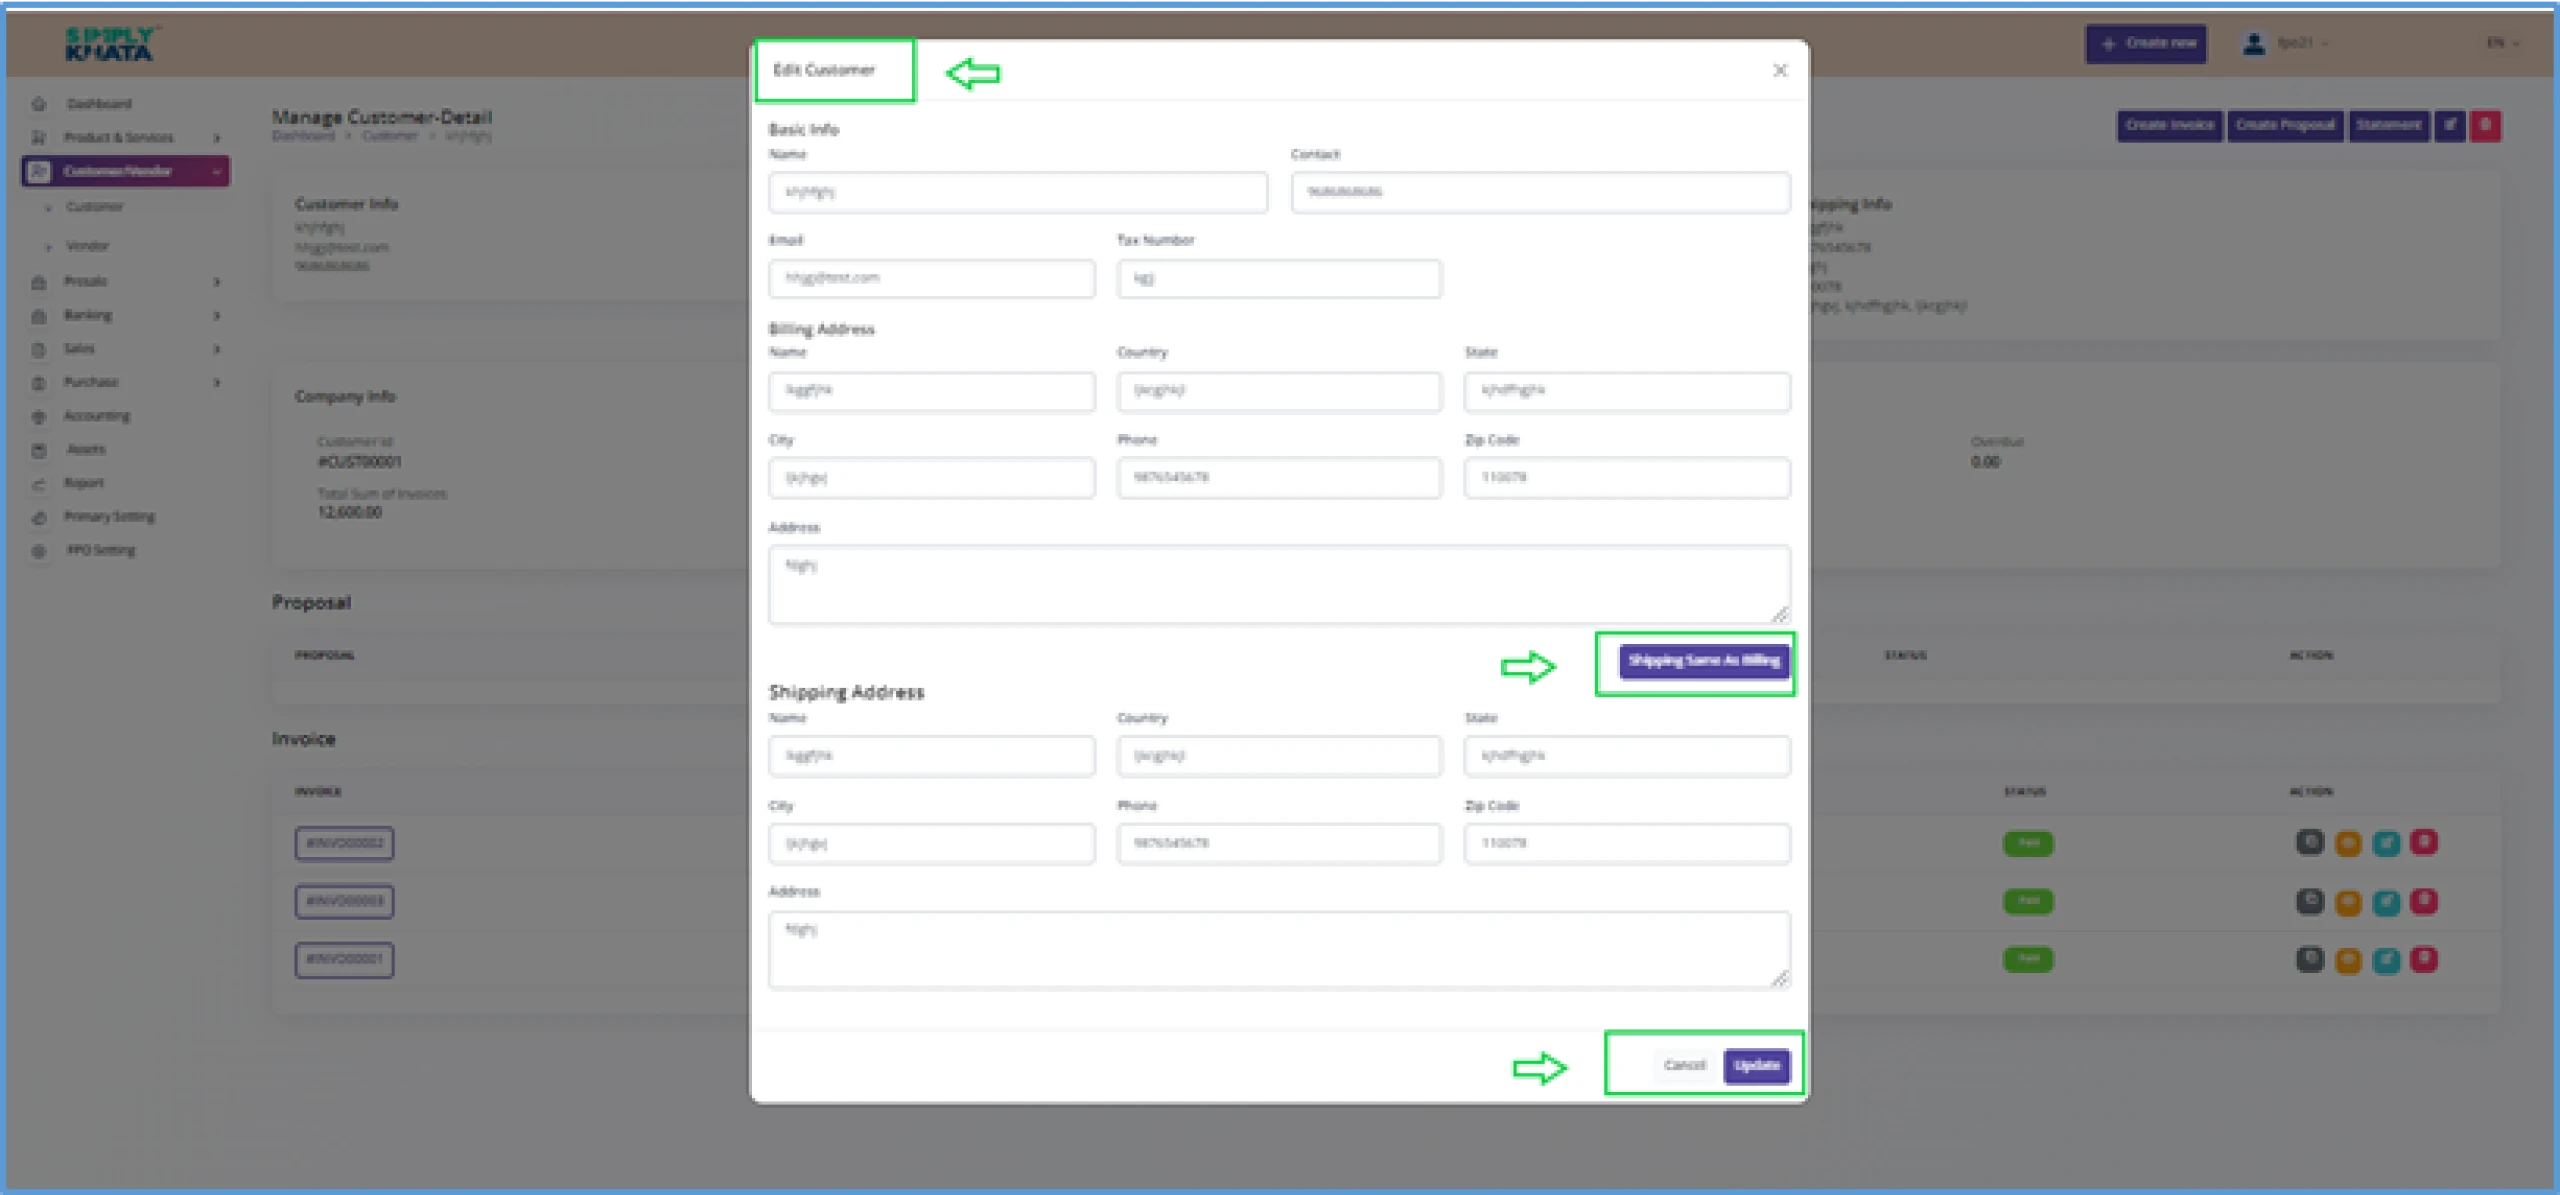
Edit the details of the customer
(by Clicking Small pencil Icon and relevant Info entry)
(Image-32)
-
Edit the details of the customer
(by Clicking Small pencil Icon and relevant Info entry)
(Image-32)
-
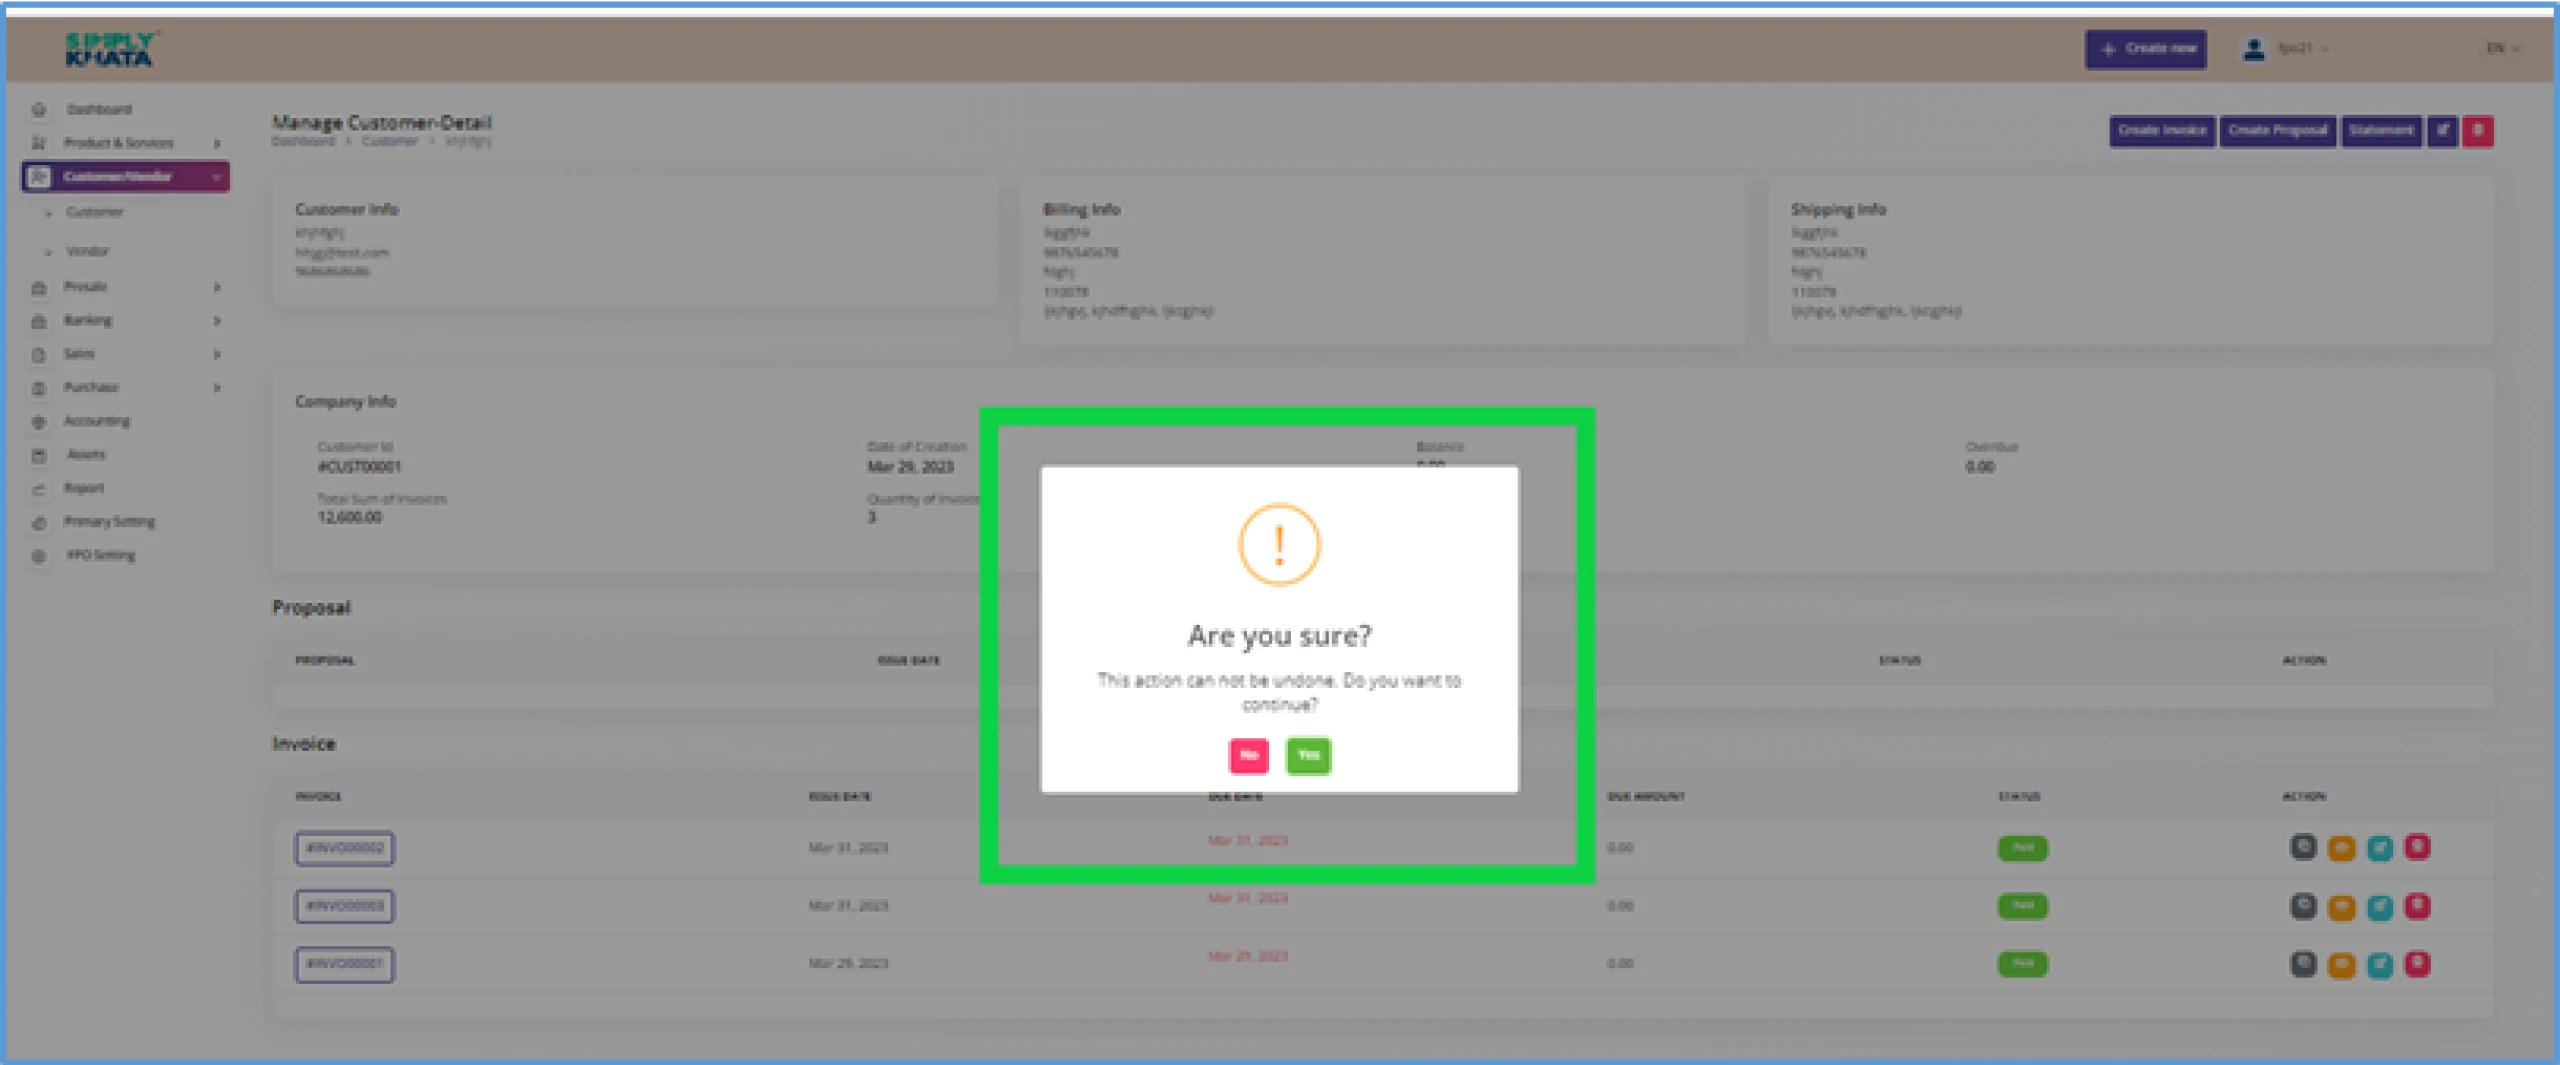
Delete the Customer.
(by Clicking Small Delete Icon and confirming delete on a page)
(Image-33)
With this option, the user can also search the Customer as per from the table
as per image-28. This option also gives user the balance summary of all the
customers in a downloadable format in excel or in other formats.
(Image -28)
(Image -29)
(Image -30)
(Image -31)
(This page gives user all the details about the customer including all the proposal, invoices
details with management option. This specific customer detail page has Create Invoice option,
create proposal option, statement option, edit customer option and delete customer option on
the right corner of the page.)
(Image -32)
(Image -33)
(Avoid the use delete option until necessary. This will delete all the data of
the customer including the Invoices and other details of the Customer.)
b. Vendors
This screen gives Vendor view and management to the user.
On this page user has three functions, which are as follows;
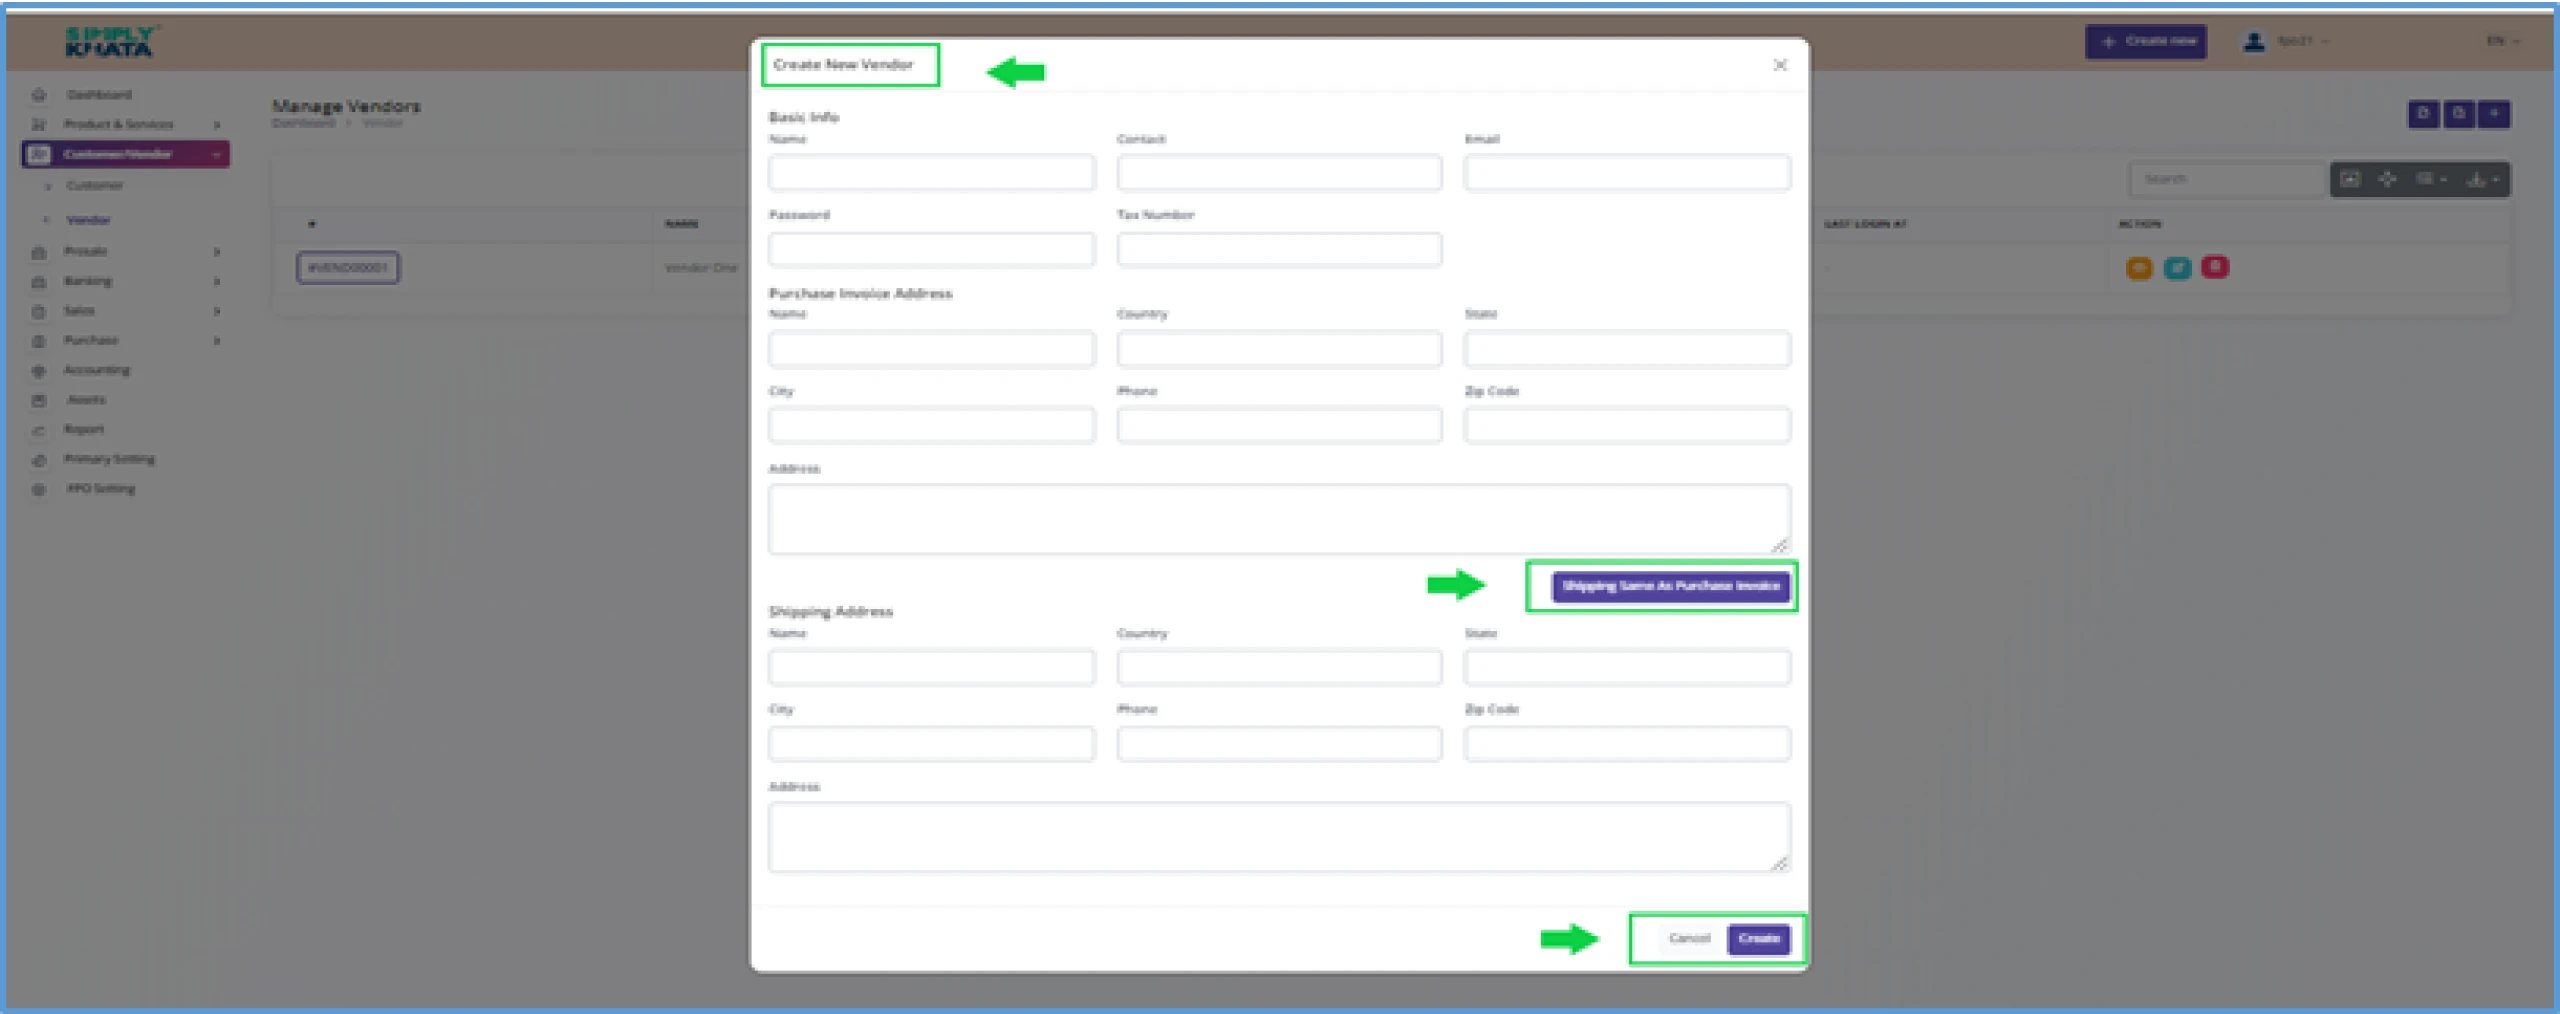
Create Vendor
Click on the small Plus Button as indicated in the Image 34 and provide
relevant basic information like as per Image- 35 >
- Name > Name of the Vendor { Mandatory }
- Contact > Contact Number of the Vendor { Mandatory } (In Numeric)
- Email > Valid Email ID of the Vendor { Mandatory } (as per format)
- Password > Valid Password for the Vendor { Mandatory } (minimum 8 Character)
- Tax Number > Valid Tax (PAN/GST) the Vendor { Mandatory } (as per format)
6. Purchase Invoice Address
- Name > of the Vendor { Mandatory }
- Country > of the Vendor { Mandatory } (India in domestics and Others in exports)
- State > of the Vendor { Mandatory } (As country)
- City > of the Vendor { Mandatory }
- Phone > of the Vendor { Mandatory } (Valid 10 Digit Phone Number)
- Zip Code > Name of the Vendor { Mandatory } (Valid 6 digit PIN code)
- Address > Address of the Vendor { Mandatory }
7. Shipping Address (Click Button If “Shipping address” is same as “Purchase Invoice address”, Fill if different)
- Name > Just Like above
- Country > Just Like above
- State > Just Like above
- City > Just Like above
- Phone > Just Like above
- Zip Code > Just Like above
- Address > Just Like above
After entering the information as suggested above, click create Button at the bottom of the page.
This action will save the Vendor for system and transaction use.
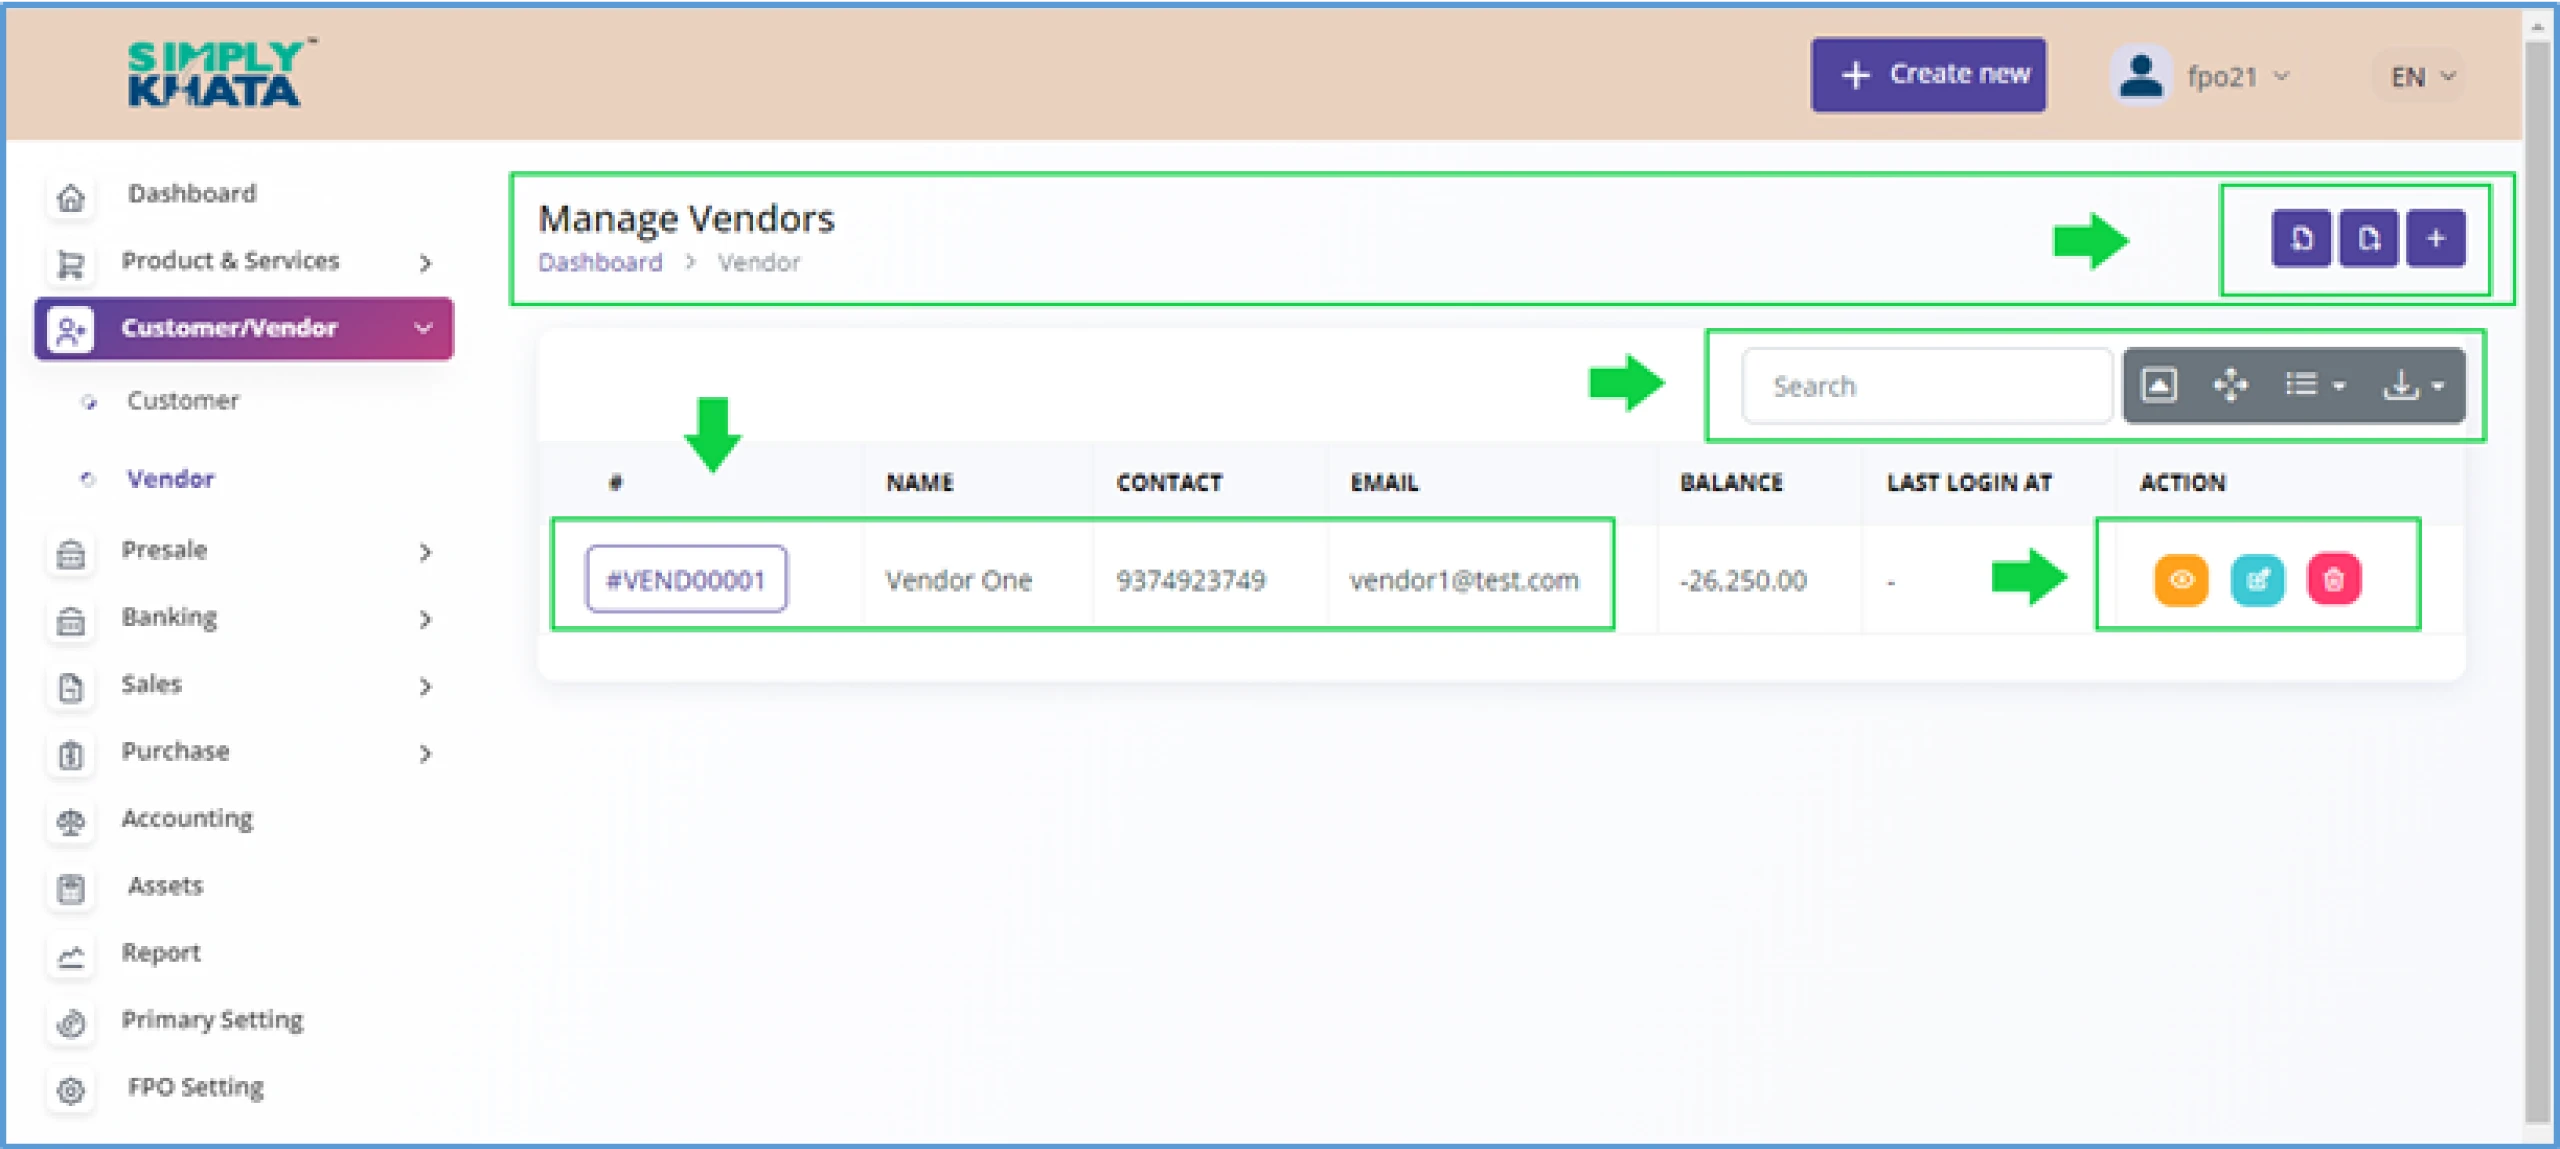
- Search Vendor in table
With this option, the user can search the Vendor as per name, contact
number and Email ID from the table as per image-34. This option gives uses
the list of all the Vendors in a downloadable format like excel or CSV
- View, manage and Delete Vendor (By Clicking the Customer ID)
In the Vendor table, User can;
-
View the Vendor Page
(by Clicking Small Eye Icon an new customer detail page opens)
(Image-36)
-
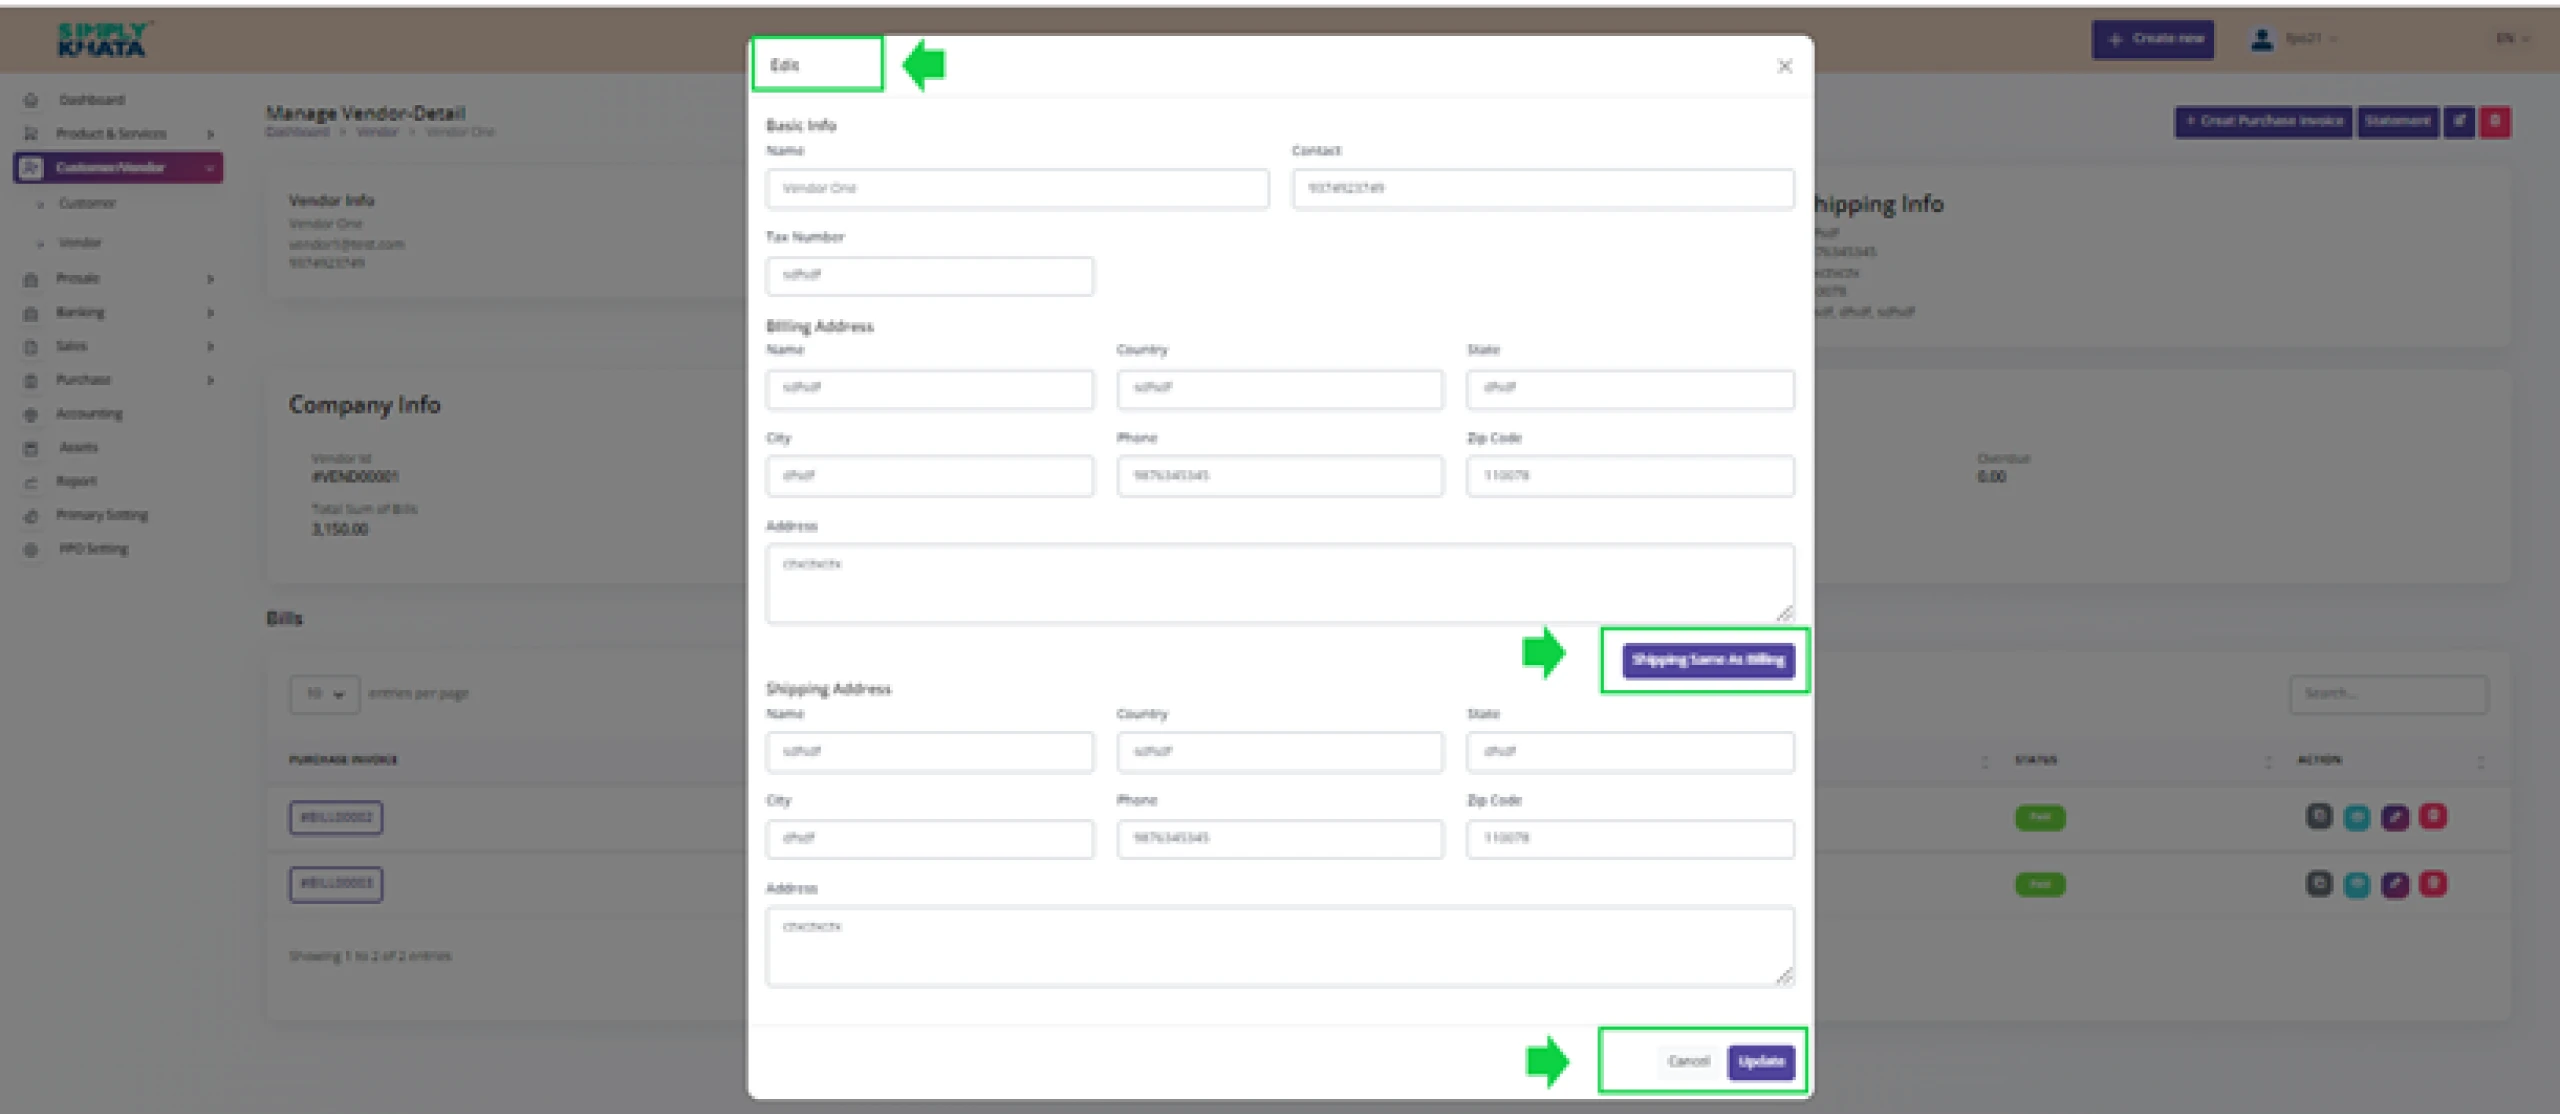
Edit the details of the Vendor
(by Clicking Small pencil Icon and relevant Info entry)
(Image-37)
-
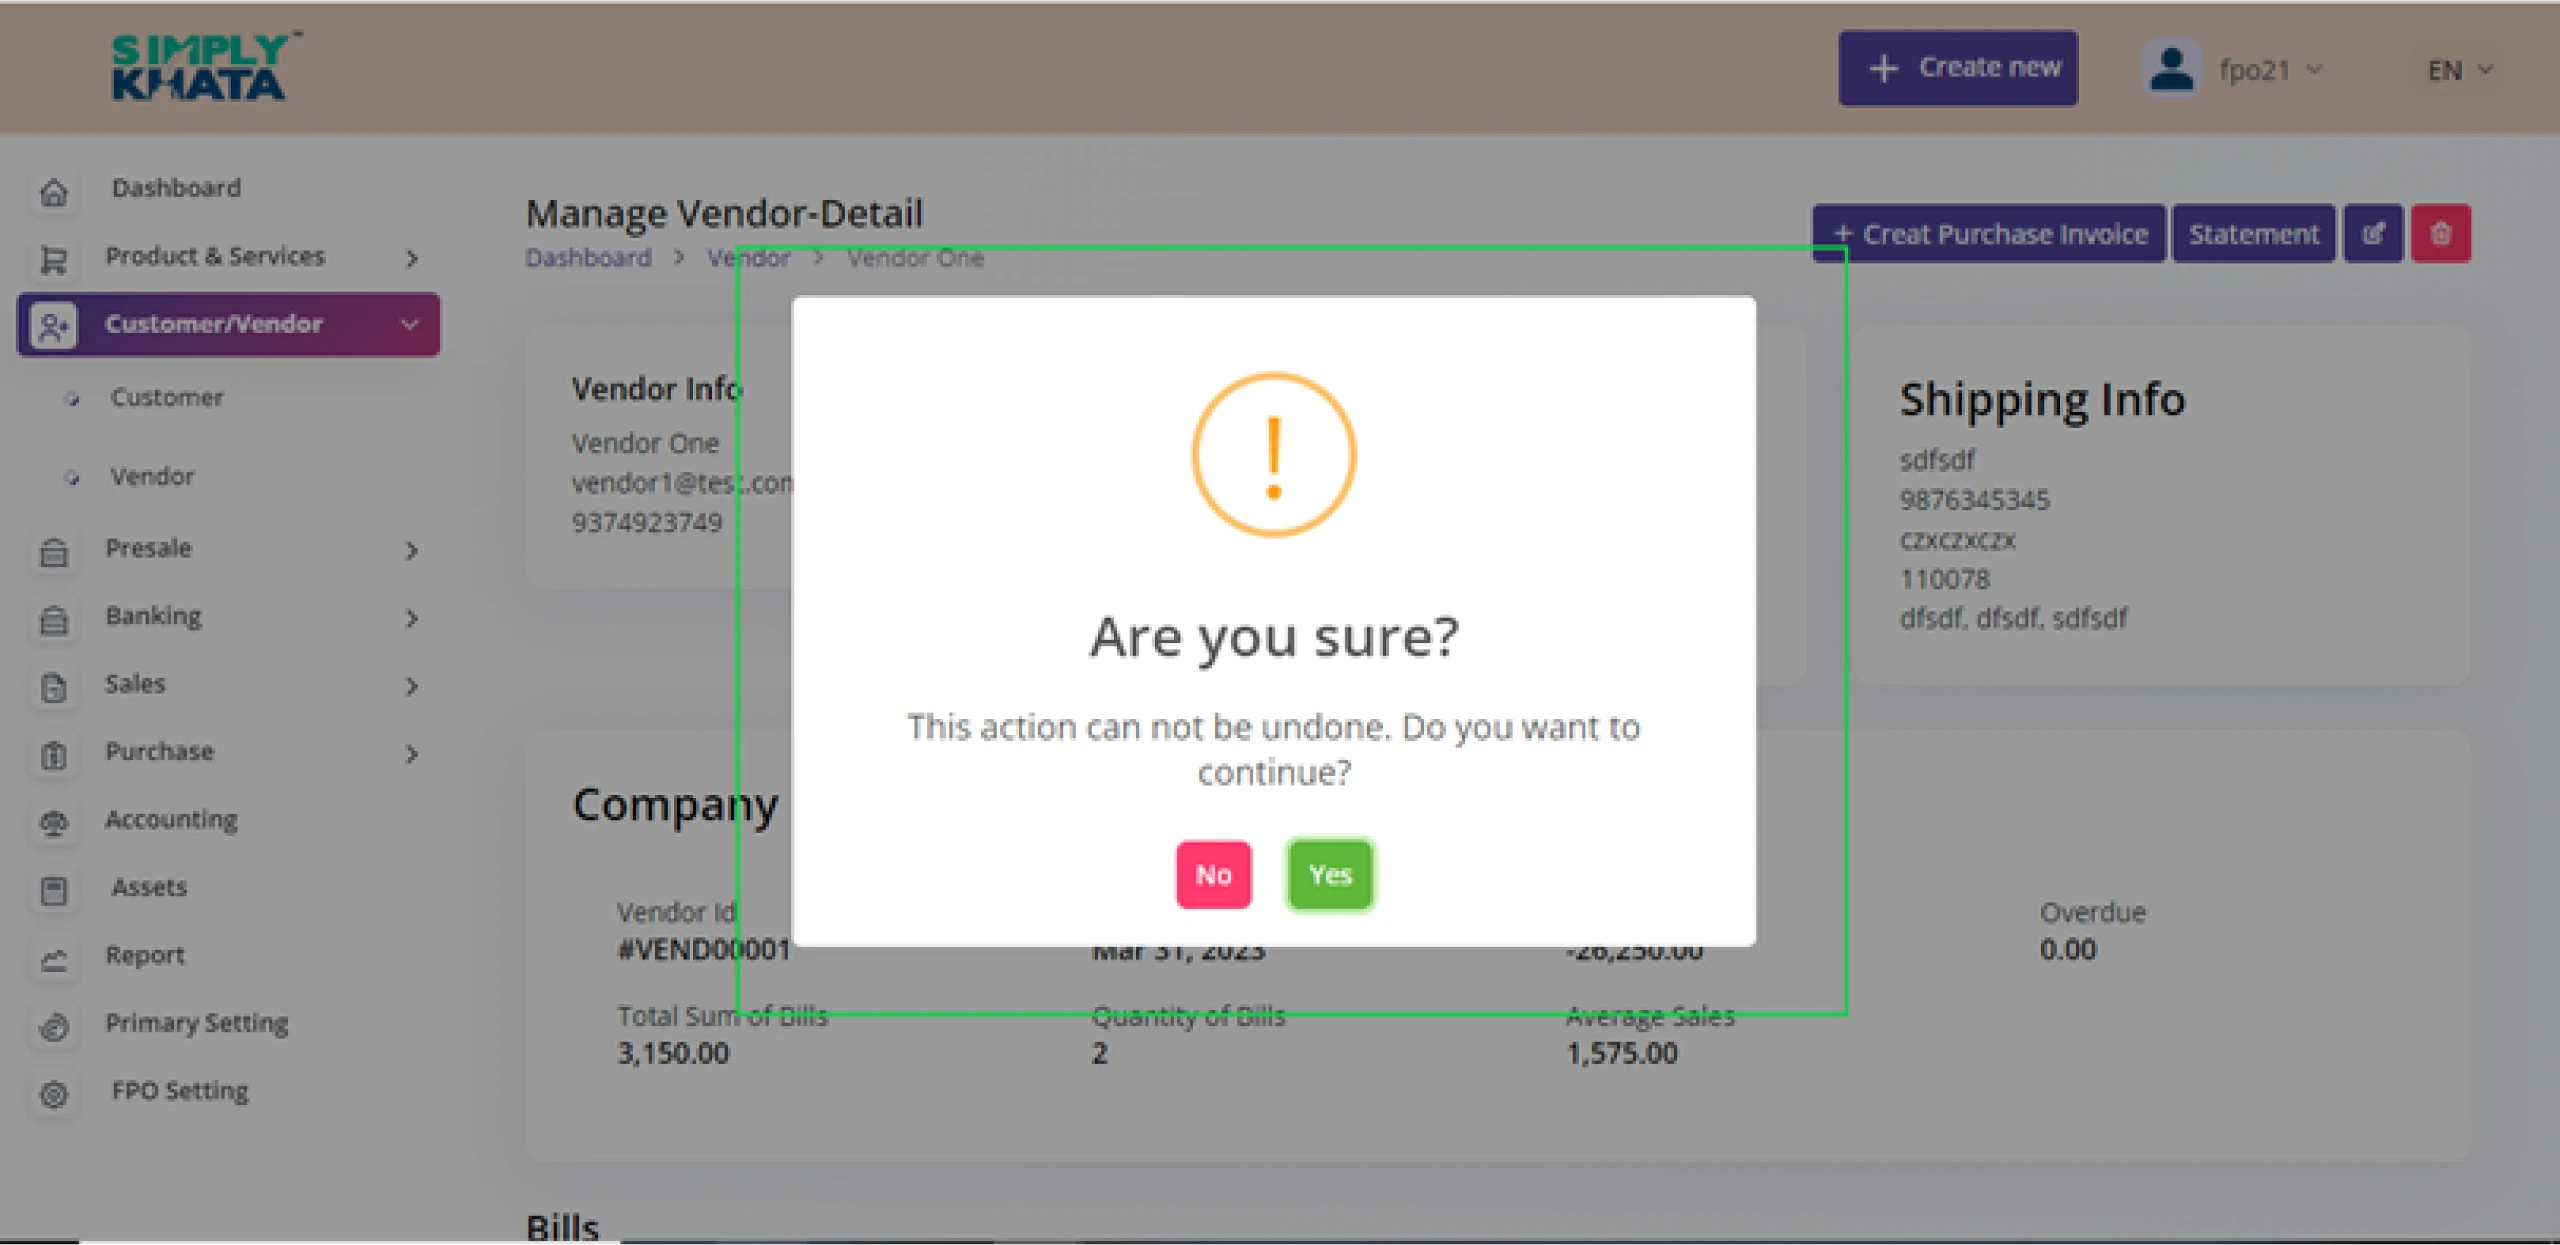
Delete the Vendor.
(by Clicking Small Delete Icon and confirming delete on a page)
(Image-38)
With this option, the user can also search the Vendor as per from the table
as per image-34. This option also gives user the balance summary of all the
Vendor in a downloadable format in excel or in other formats.
(Image -34)
(Image -35)
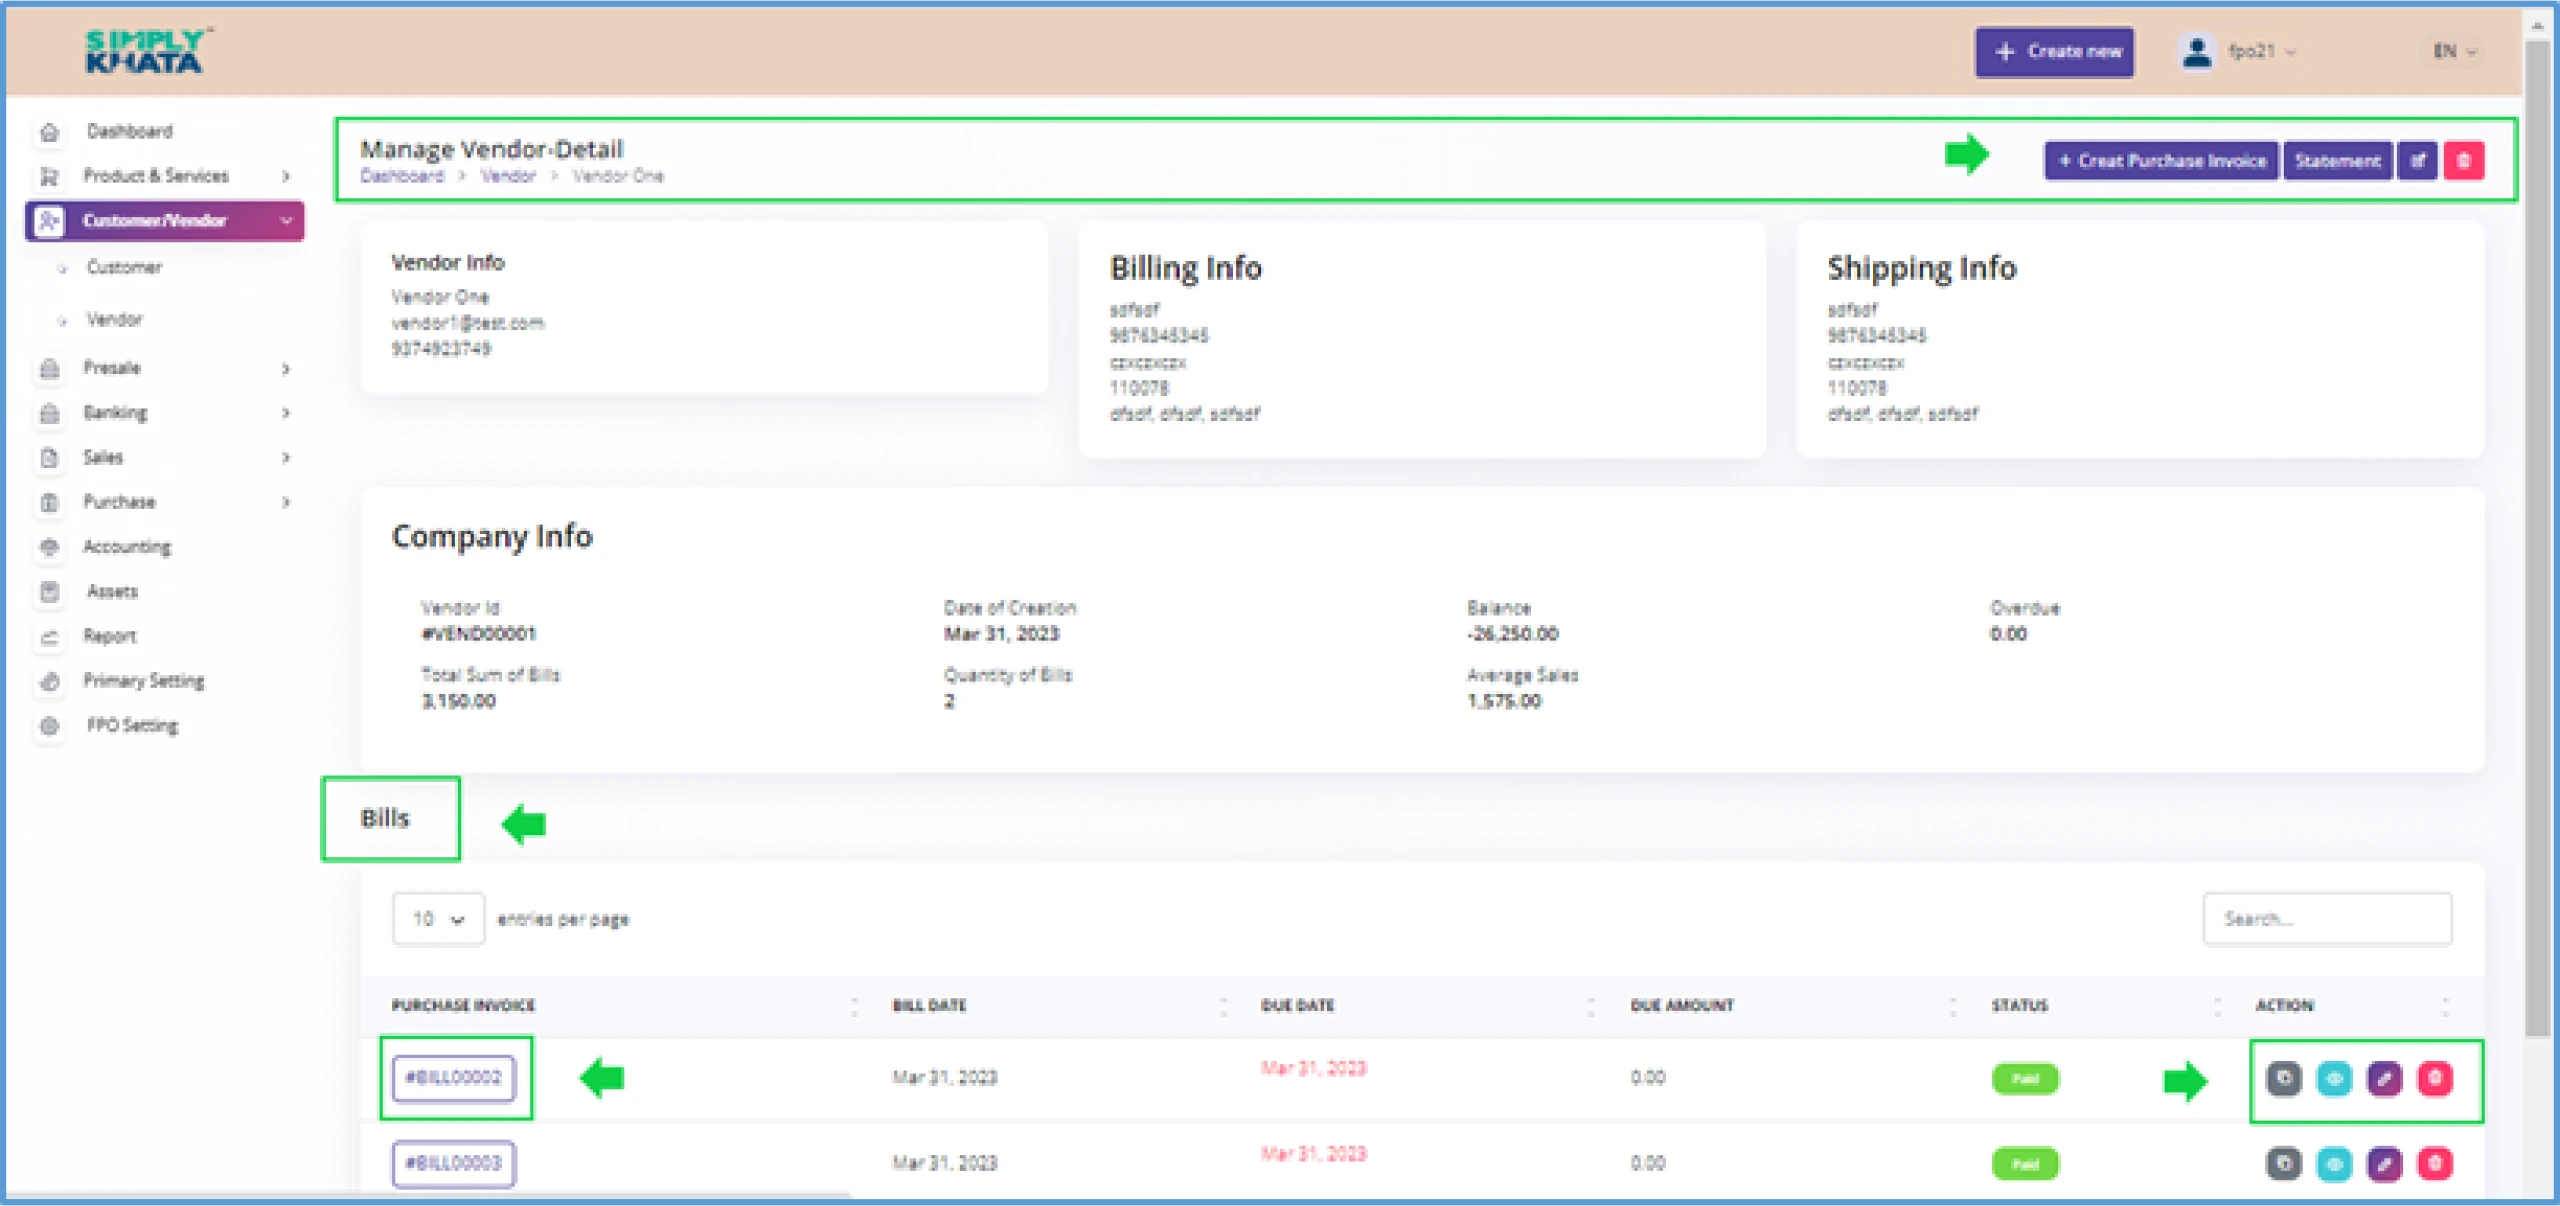
(Image -36)
(This page gives user all the details about the customer including all the bills details with management option.
This specific customer detail page has Create Purchase Invoice option,
statement option, edit Vendor option and delete Vendor option on the right corner of the page.)
(Image -37)
(Image -38)
(Avoid the use delete option until necessary. This will delete all the data of the
customer including the Purchase invoices and other details of the Vendor.)
This entry deals with the Customers & Vendors of the FPOs and it gives two option to the user. These options (screen option) are as follows;
a. Customers
This screen gives Customer view and management to the user. On this page user has three functions, which are as follows;
- Create Customer
Click on the small Plus Button as indicated in the Image 28 and provide relevant basic information like as per Image- 29>
- Name > Name of the Customer {Mandatory}
- Contact > Contact Number of the Customer {Mandatory} (In Numeric)
- Email > Valid Email ID of the Customer {Mandatory} (as per format)
- Password > Valid Password for the Customer {Mandatory} (minimum 8 Character)
- Tax Number > Valid Tax (PAN/GST) the Customer {Mandatory} (as per format)
6. Purchase Invoice Address
- Name > of the Customer { Mandatory }
- Country > of the Customer { Mandatory } ( India in domestics and Others in exports)
- State > of the Customer { Mandatory } ( As country)
- City > of the Customer { Mandatory }
- Phone > of the Customer { Mandatory } ( Valid 10 Digit Phone Number)
- Zip Code > Name of the Customer { Mandatory } ( Valid 6 digit PIN code)
- Address > Address of the Customer { Mandatory }
7. Shipping Address (Click Button If “Shipping address” is same as “Purchase Invoice address”, Fill if different)
- Name > Just Like above
- Country > Just Like above
- State > Just Like above
- City > Just Like above
- Phone > Just Like above
- Zip Code > Just Like above
- Address > Just Like above
After entering the information as suggested above, click create Button at the bottom of the page. This action will save the Customer for system and transaction us
- Search Customer in table
With this option, the user can search the customer as per name, contact number and Email ID category from the table as per image-28. This option gives uses the list of all the customers in a downloadable format like excel or CSV
- View, manage and Delete Customers (By Clicking the Customer ID)
In the Customer table, User can;
- View the customer Page (by Clicking Small Eye Icon an new customer detail page opens) (Image-31)
- Edit the details of the customer (by Clicking Small pencil Icon and relevant Info entry) (Image-32)
- Edit the details of the customer (by Clicking Small pencil Icon and relevant Info entry) (Image-32)
- Delete the Customer. (by Clicking Small Delete Icon and confirming delete on a page) (Image-33)
With this option, the user can also search the Customer as per from the table as per image-28. This option also gives user the balance summary of all the customers in a downloadable format in excel or in other formats.
(Image -28)
(Image -29)
(Image -30)
(Image -31)
(This page gives user all the details about the customer including all the proposal, invoices details with management option. This specific customer detail page has Create Invoice option, create proposal option, statement option, edit customer option and delete customer option on the right corner of the page.)
(Image -32)
(Image -33)
(Avoid the use delete option until necessary. This will delete all the data of the customer including the Invoices and other details of the Customer.)
b. Vendors
This screen gives Vendor view and management to the user. On this page user has three functions, which are as follows;
Click on the small Plus Button as indicated in the Image 34 and provide relevant basic information like as per Image- 35 >
- Name > Name of the Vendor { Mandatory }
- Contact > Contact Number of the Vendor { Mandatory } (In Numeric)
- Email > Valid Email ID of the Vendor { Mandatory } (as per format)
- Password > Valid Password for the Vendor { Mandatory } (minimum 8 Character)
- Tax Number > Valid Tax (PAN/GST) the Vendor { Mandatory } (as per format)
6. Purchase Invoice Address
- Name > of the Vendor { Mandatory }
- Country > of the Vendor { Mandatory } (India in domestics and Others in exports)
- State > of the Vendor { Mandatory } (As country)
- City > of the Vendor { Mandatory }
- Phone > of the Vendor { Mandatory } (Valid 10 Digit Phone Number)
- Zip Code > Name of the Vendor { Mandatory } (Valid 6 digit PIN code)
- Address > Address of the Vendor { Mandatory }
7. Shipping Address (Click Button If “Shipping address” is same as “Purchase Invoice address”, Fill if different)
- Name > Just Like above
- Country > Just Like above
- State > Just Like above
- City > Just Like above
- Phone > Just Like above
- Zip Code > Just Like above
- Address > Just Like above
After entering the information as suggested above, click create Button at the bottom of the page. This action will save the Vendor for system and transaction use.
- Search Vendor in table
With this option, the user can search the Vendor as per name, contact number and Email ID from the table as per image-34. This option gives uses the list of all the Vendors in a downloadable format like excel or CSV
- View, manage and Delete Vendor (By Clicking the Customer ID)
In the Vendor table, User can;
- View the Vendor Page (by Clicking Small Eye Icon an new customer detail page opens) (Image-36)
- Edit the details of the Vendor (by Clicking Small pencil Icon and relevant Info entry) (Image-37)
- Delete the Vendor. (by Clicking Small Delete Icon and confirming delete on a page) (Image-38)
With this option, the user can also search the Vendor as per from the table as per image-34. This option also gives user the balance summary of all the Vendor in a downloadable format in excel or in other formats.
(Image -34)
(Image -35)
(Image -36)
(This page gives user all the details about the customer including all the bills details with management option. This specific customer detail page has Create Purchase Invoice option, statement option, edit Vendor option and delete Vendor option on the right corner of the page.)
(Image -37)
(Image -38)
(Avoid the use delete option until necessary. This will delete all the data of the customer including the Purchase invoices and other details of the Vendor.)