Primary Setting
There are 6 sub settings in the FPO setting option
- Taxes
- Category
- Unit
- Custom Field (Keep Default No change required)
- User (Keep Default No change required)
- Role (Keep Default No change required)
As shown in the Image ( 9 ), these settings are accessible by clicking the
available respective icons in the grid. After clicking these Icons, the system will
take you the respective setting page, which is available for making required
changes in the system for customised use

(Image -9)
a. Taxes (Sub-Setting Entry 1st)
Click on the Primary Setting, and then click on Taxes, then go to a small
“Plus” button Icon on right corner above search bar (As per Image 10), and
then click the plus button to open new Create Tax Prompt as per (Image
11). Enter tax name in First field
(Tax name can have number also so it is a good practice to add some numbers so that
it can be remembered at the time of product creations for Ex. IGST12 signifies Indian GST @ 12%).
The Rate in Numeric form in the Second field ( Do not add percentage sign ) and then
click the create button, it will save the tax rate in the table below on the
same page.
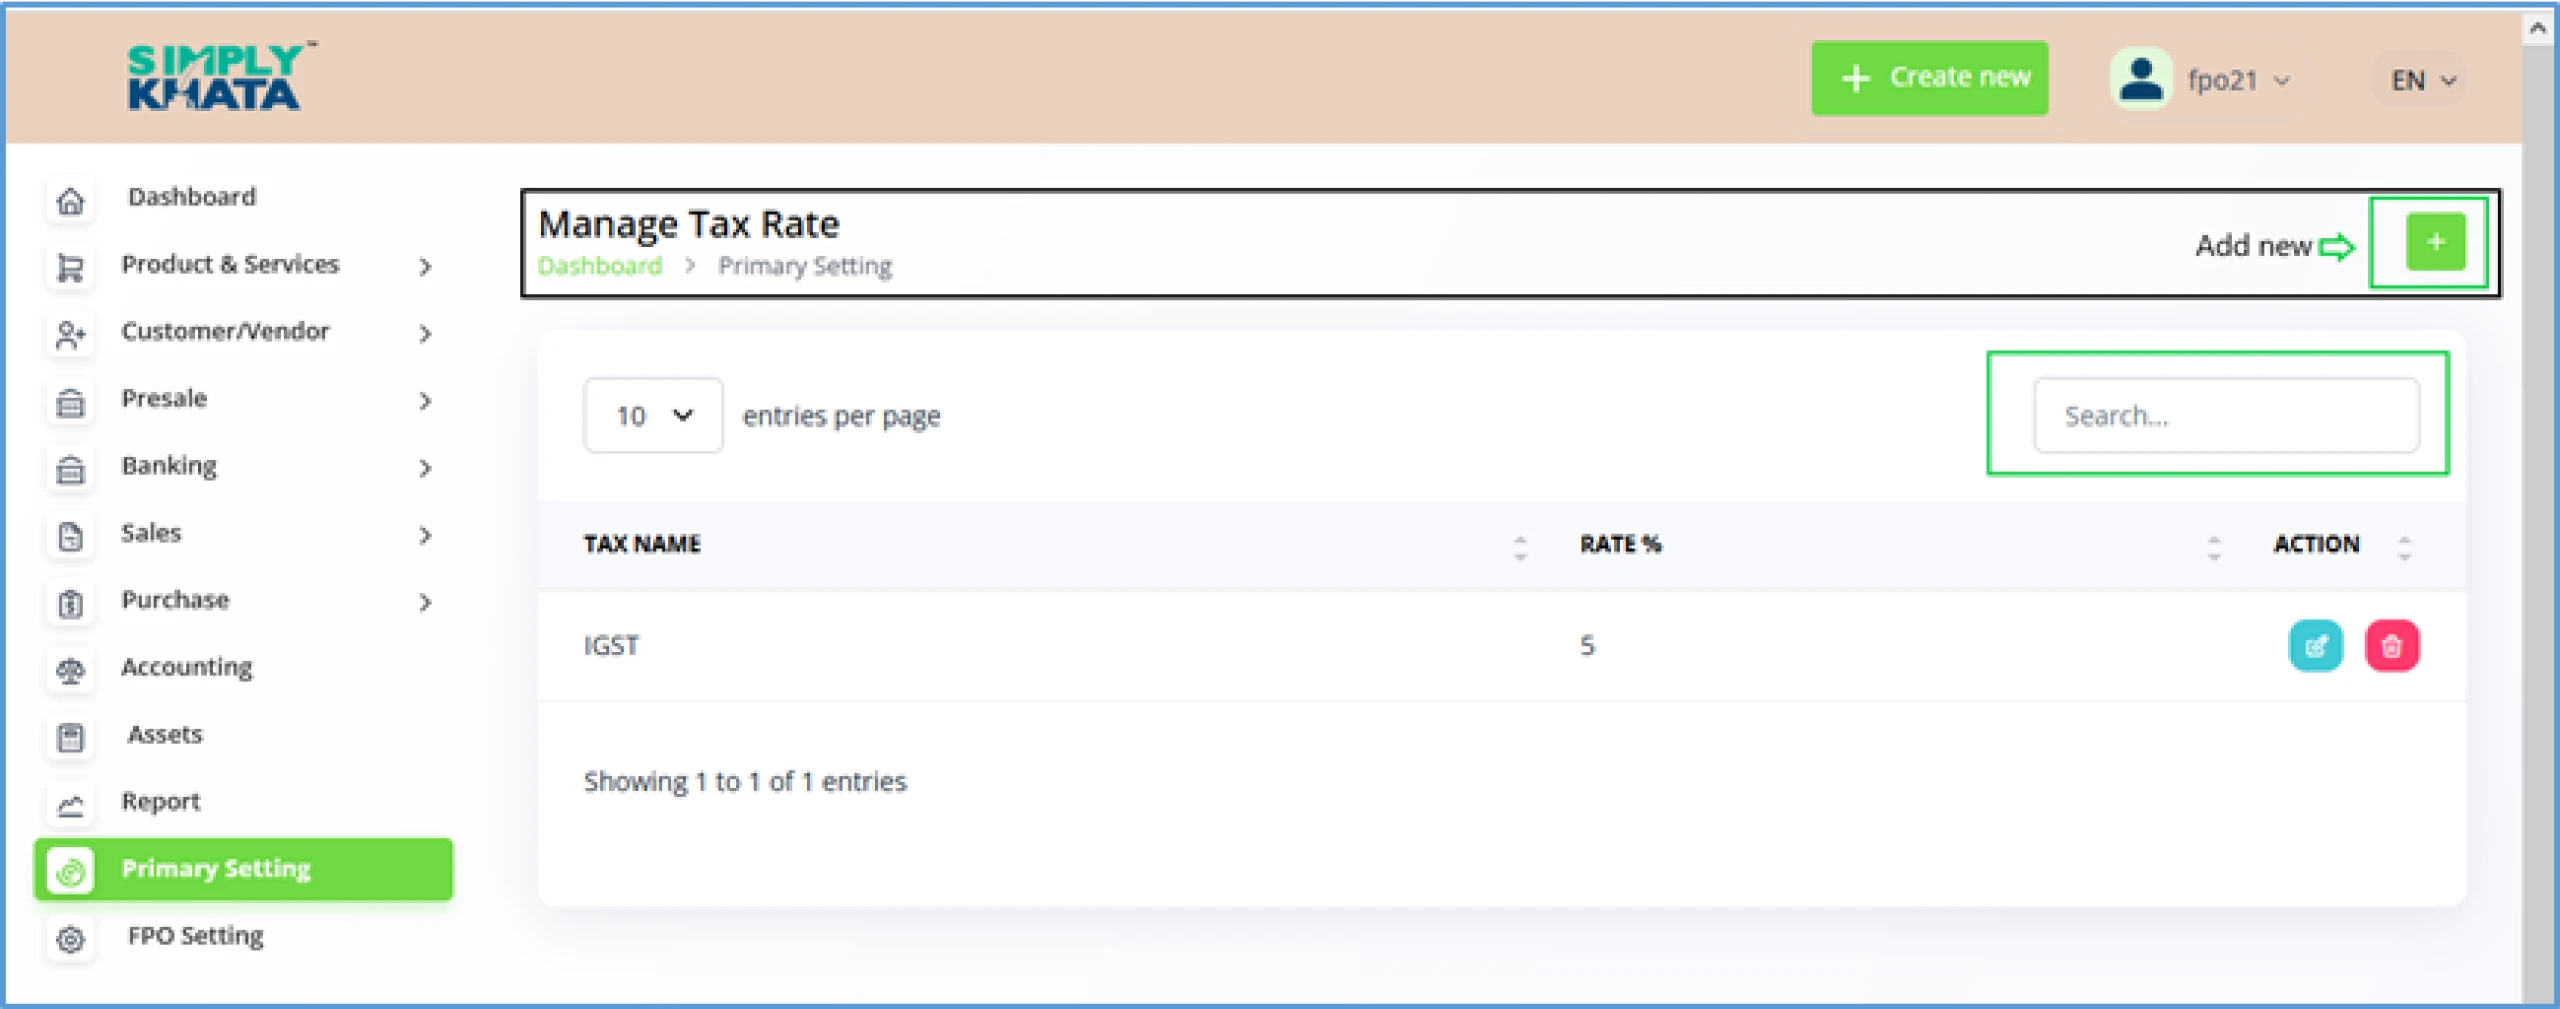
Image -10
b. Category (Sub-Setting Entry 2nd)
User can define multiple categories of Products, Income and Expenses for business
requirements within the system subject to limitation of 200 entries.
User can edit these entries also if required. However, it is a system suggestion that User create a new category if required.
Click on the Primary Setting, and then click on Category (Categories are
required to define the product Income and expenses in the system), then go to a small
“Plus” button Icon on right corner above search bar (As per Image 12),
and then click the plus button to open new Create Category as per (Image 13). Enter Category name in
First field and then select category from dropdown. In this Dropdown, system has three options;
- Products and Services
- Income
- Expenses
System also gives colour options for all the three type of categories so that
these categories come on the graph on the dashboard in an Identifiable
manner
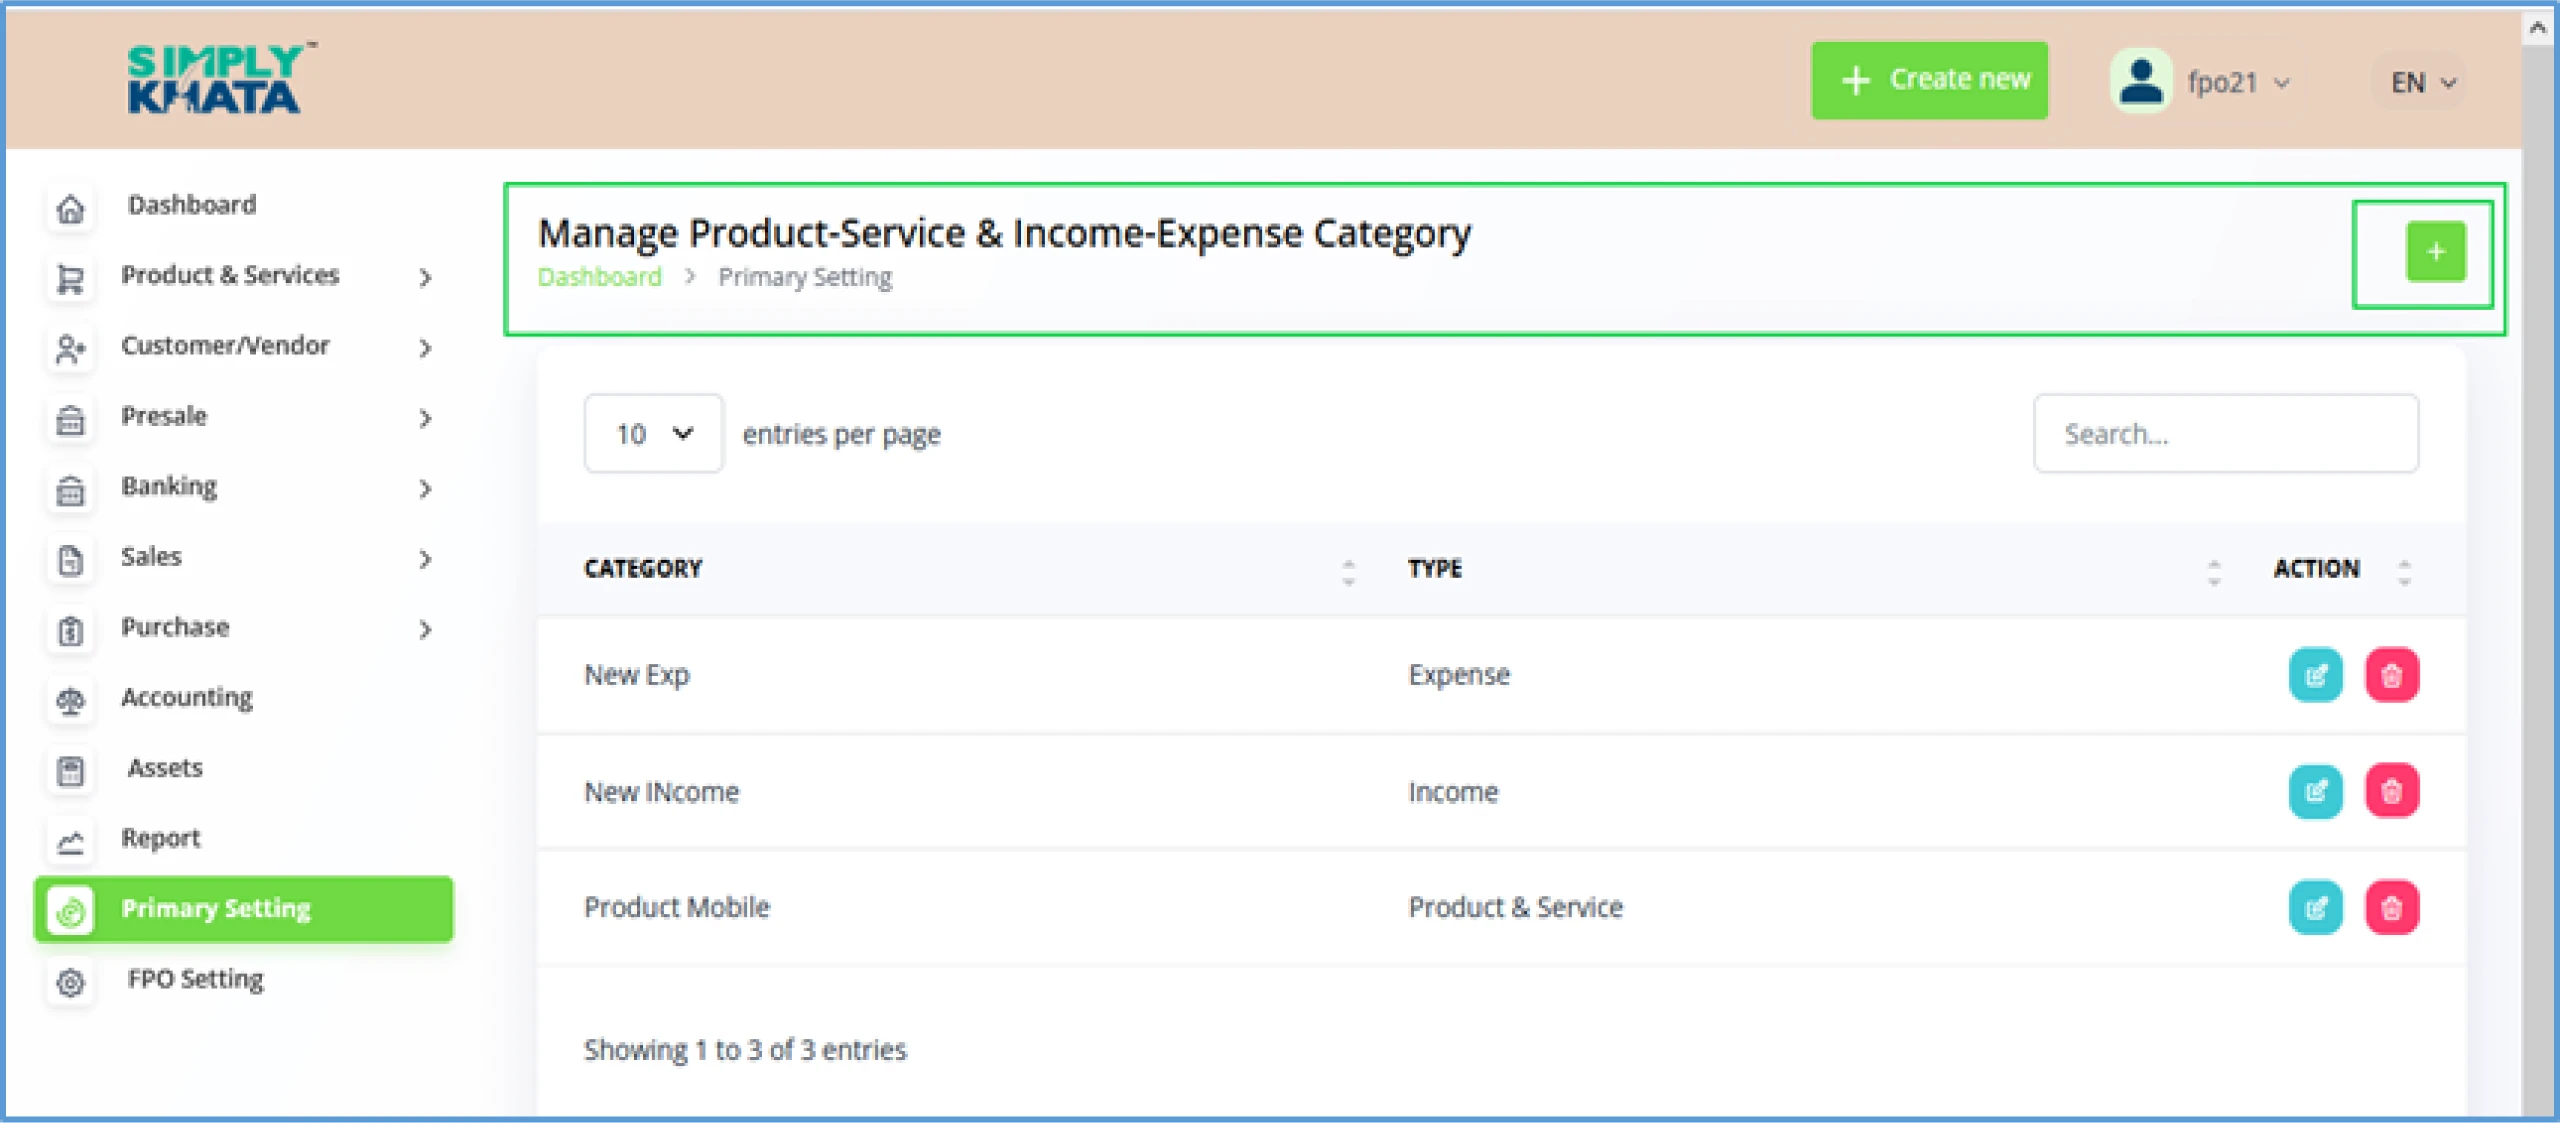
(Image -12)
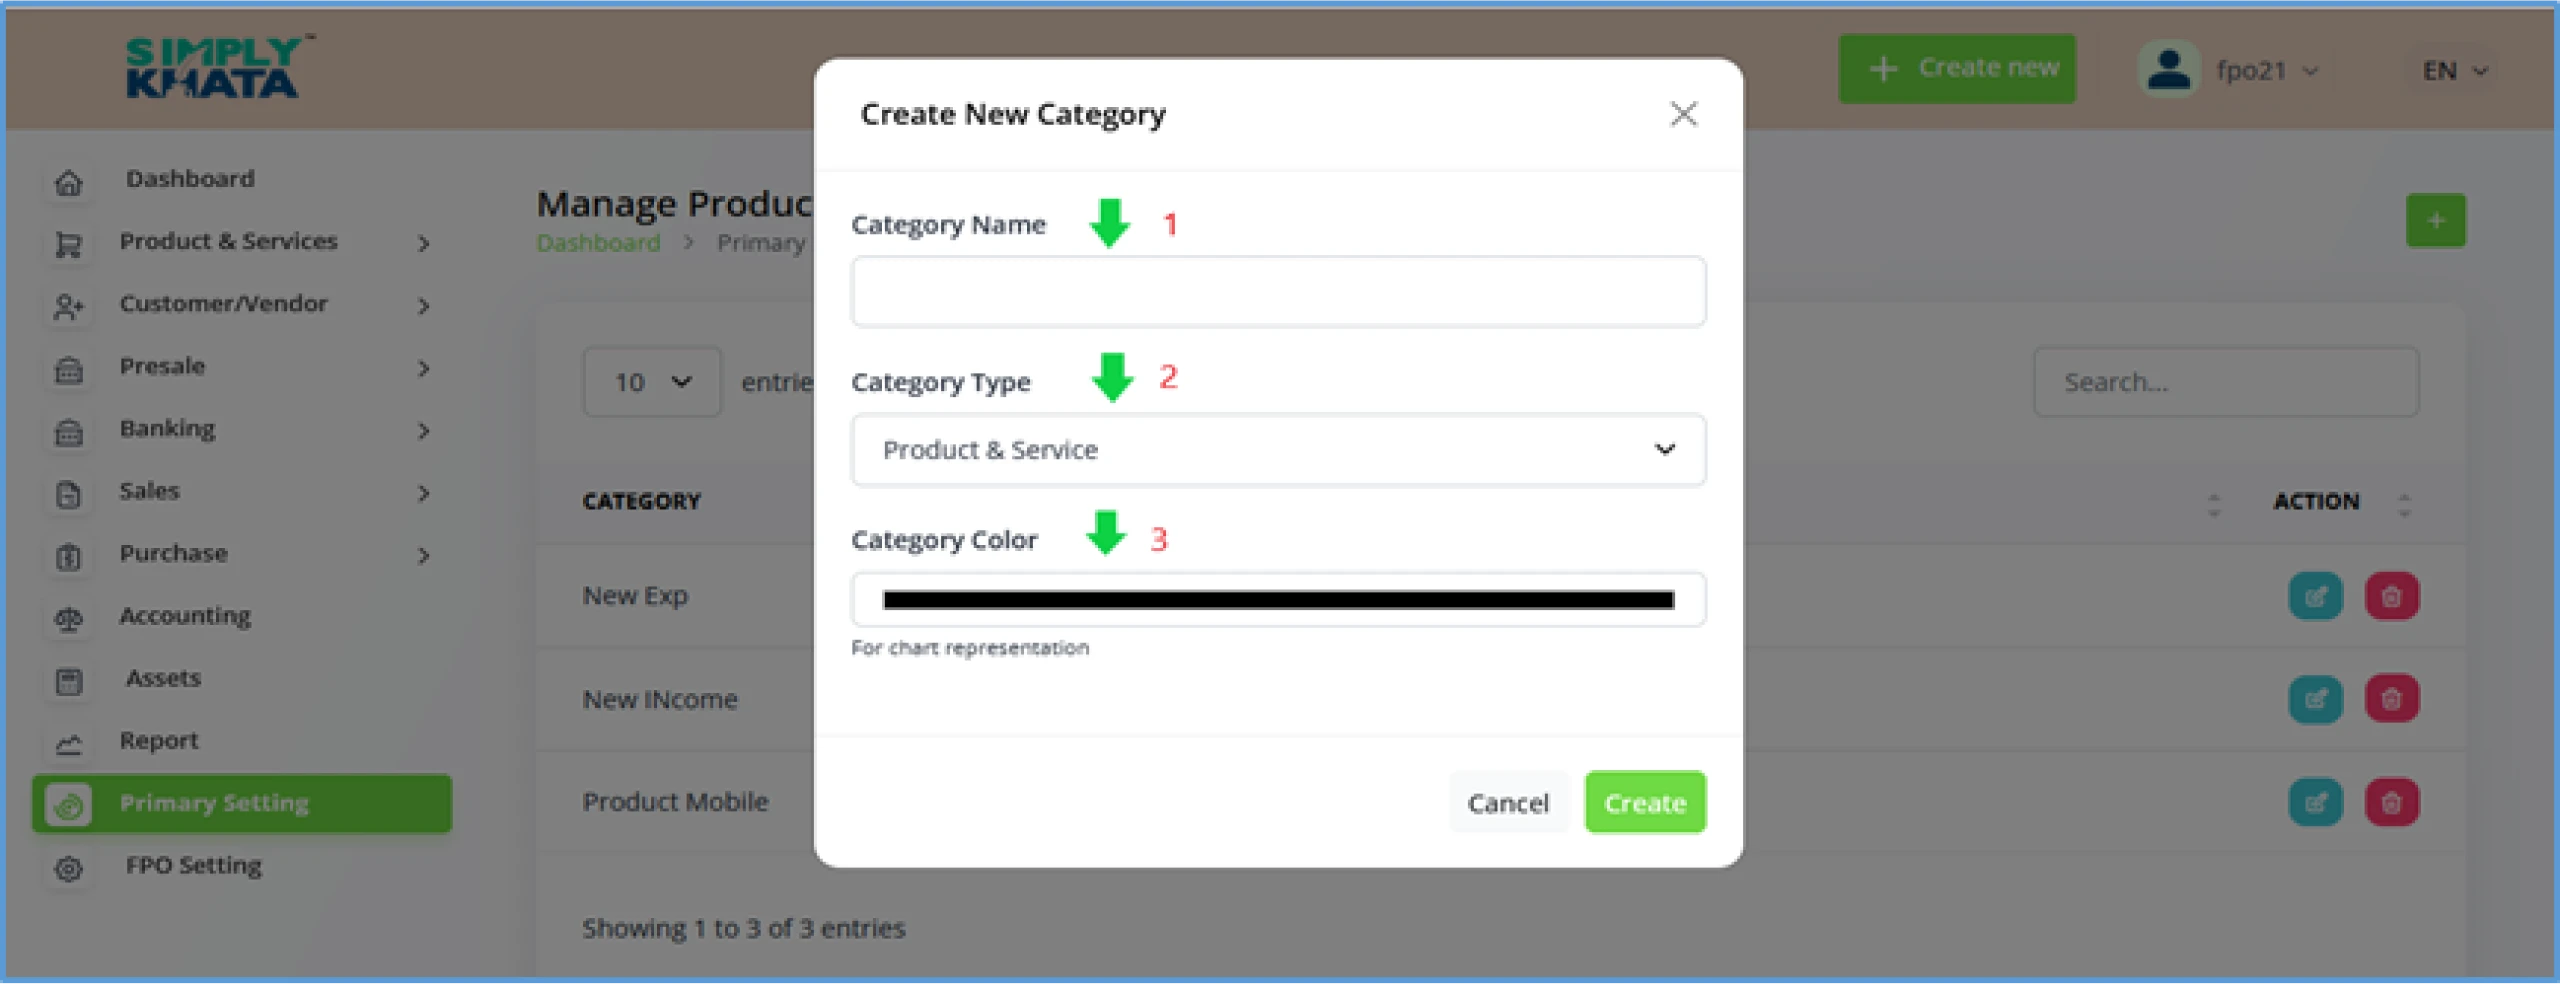
Image -13
c. Unit (Sub-Setting Entry 3rd)
System also defines the Unit for the products and services which a FPO undertakes.
For example if the FPOs is in the business of selling the Grains like Rice Wheat,
Barley, Corn then the unit will be KGs.
The FPO user can define multiple units as per the product of the FPOs.
For accessing the Unit setting user need to Click on the Primary Setting, and then click on
Unit then go to a small “Plus” button Icon on right
corner above search bar (As per Image 14), and then click the plus button to open new Create Unit prompt as per (Image 15).
Enter Unit name in field ( Only one field ) and then click green Create Button.
This will create a unit and it will be available in the table on the same page.
The units which are available on this page will also be needed for product creation.
The defining the Unit is a critical setting for the system as all the product creation is not possible with the definition of the UNIT.
Don not use long name for the Unit as it will be easy to see that at the time of creation of the Product.
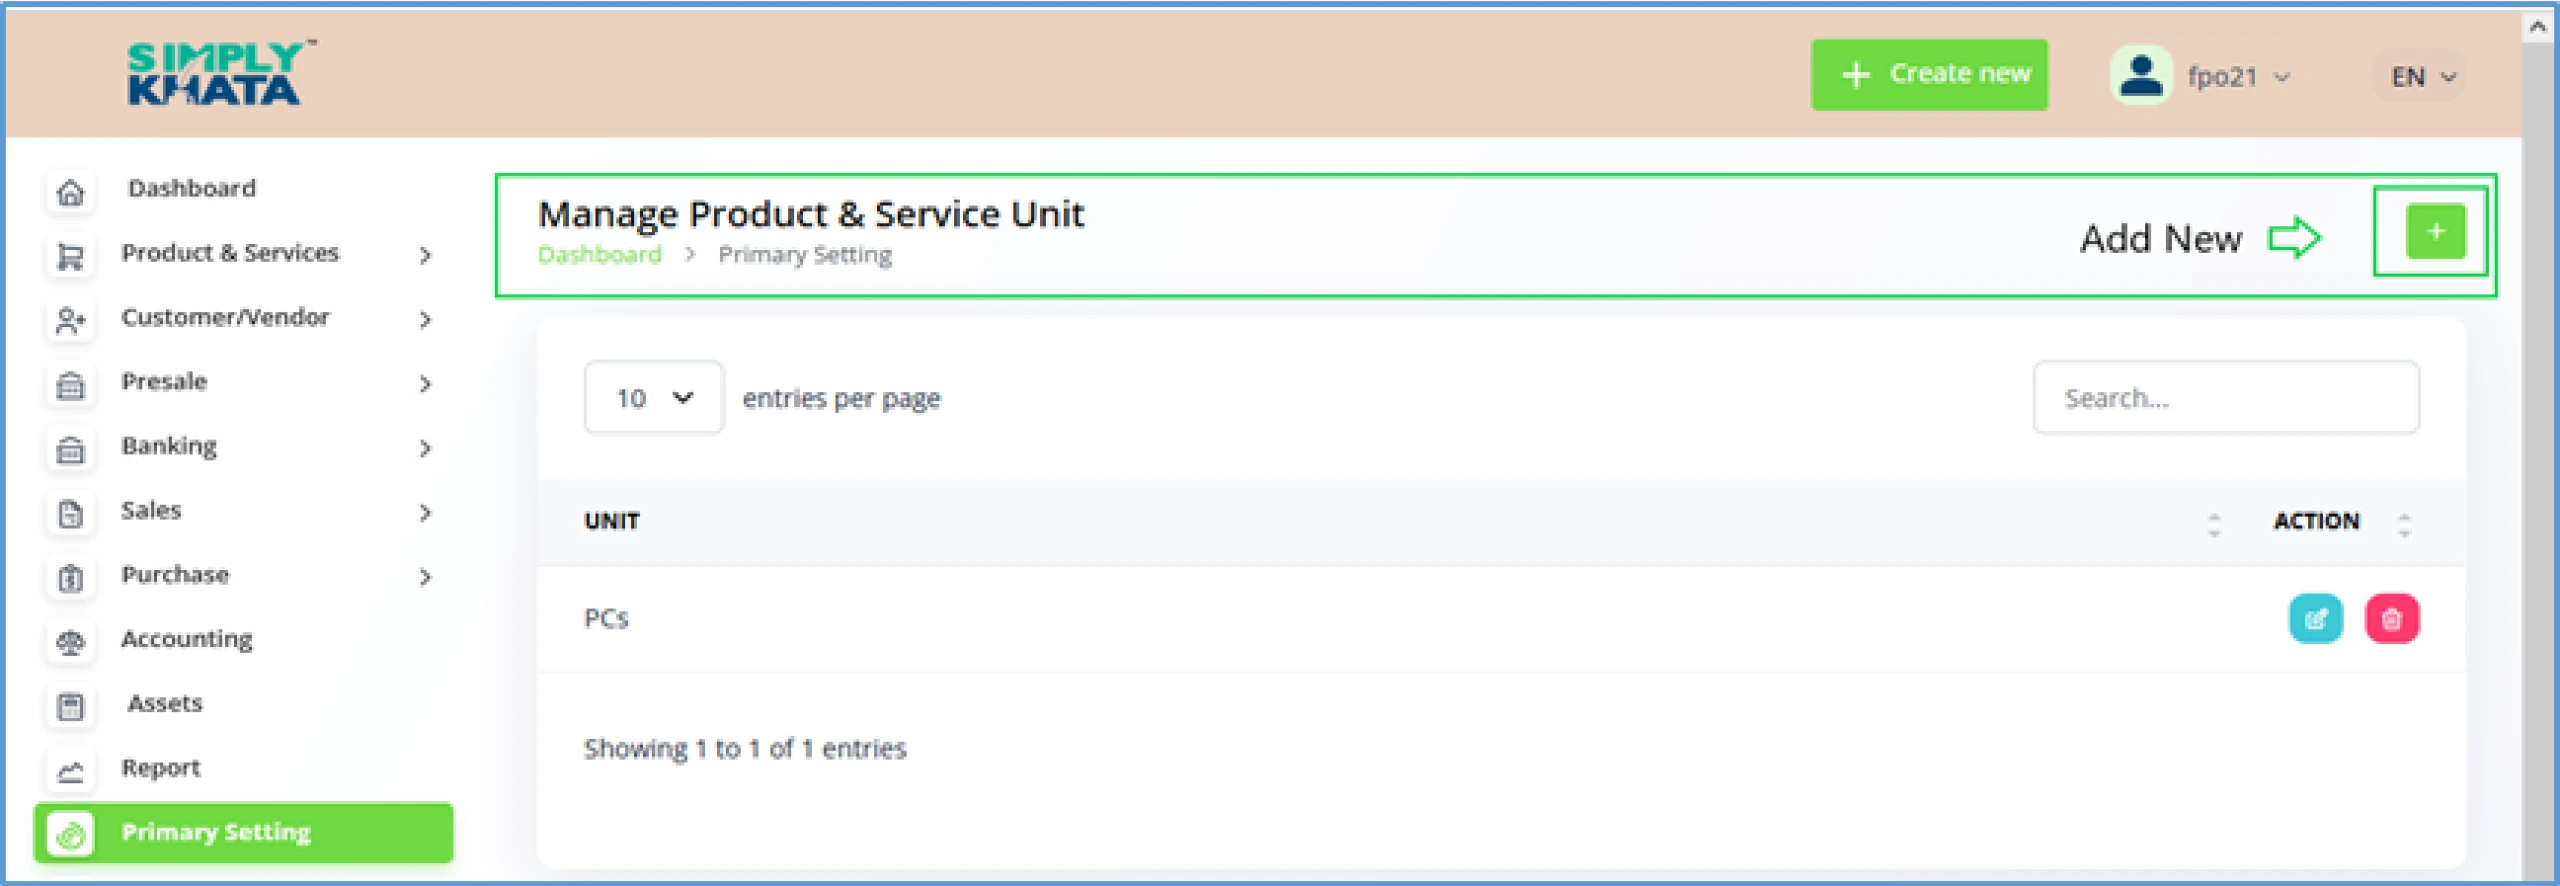
Image -14
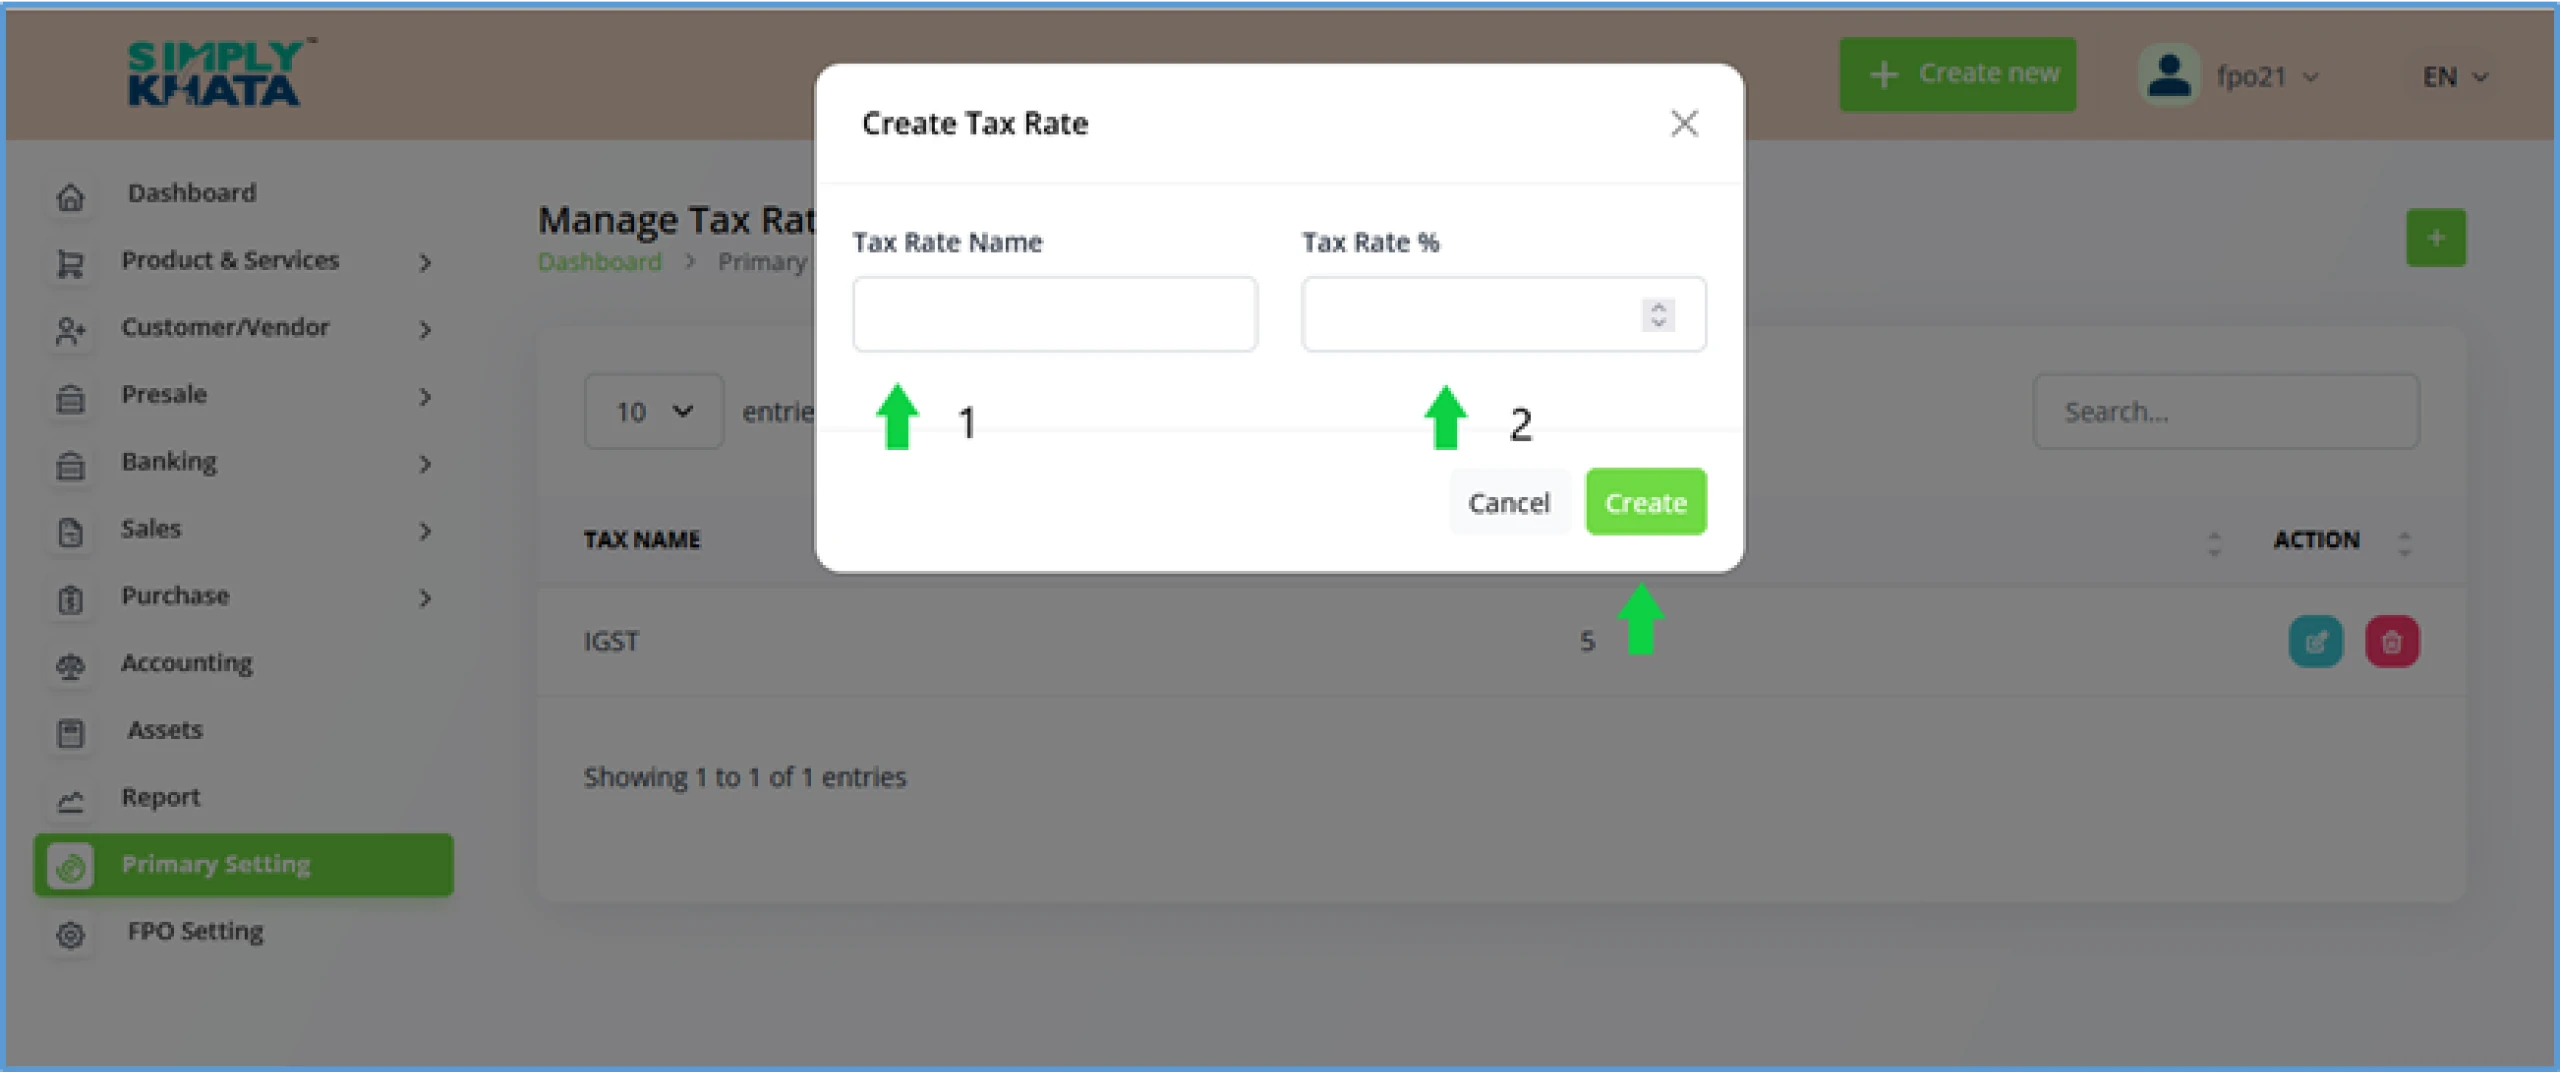
Image -11

Image -15
d. Custom Fields (Sub-Setting Entry 4th)
Keep Default No changes required
e. User (Sub-Setting Entry 5th)
Keep Default No changes required
f. Role (Sub-Setting Entry 6th)
Keep Default < Don’t change>
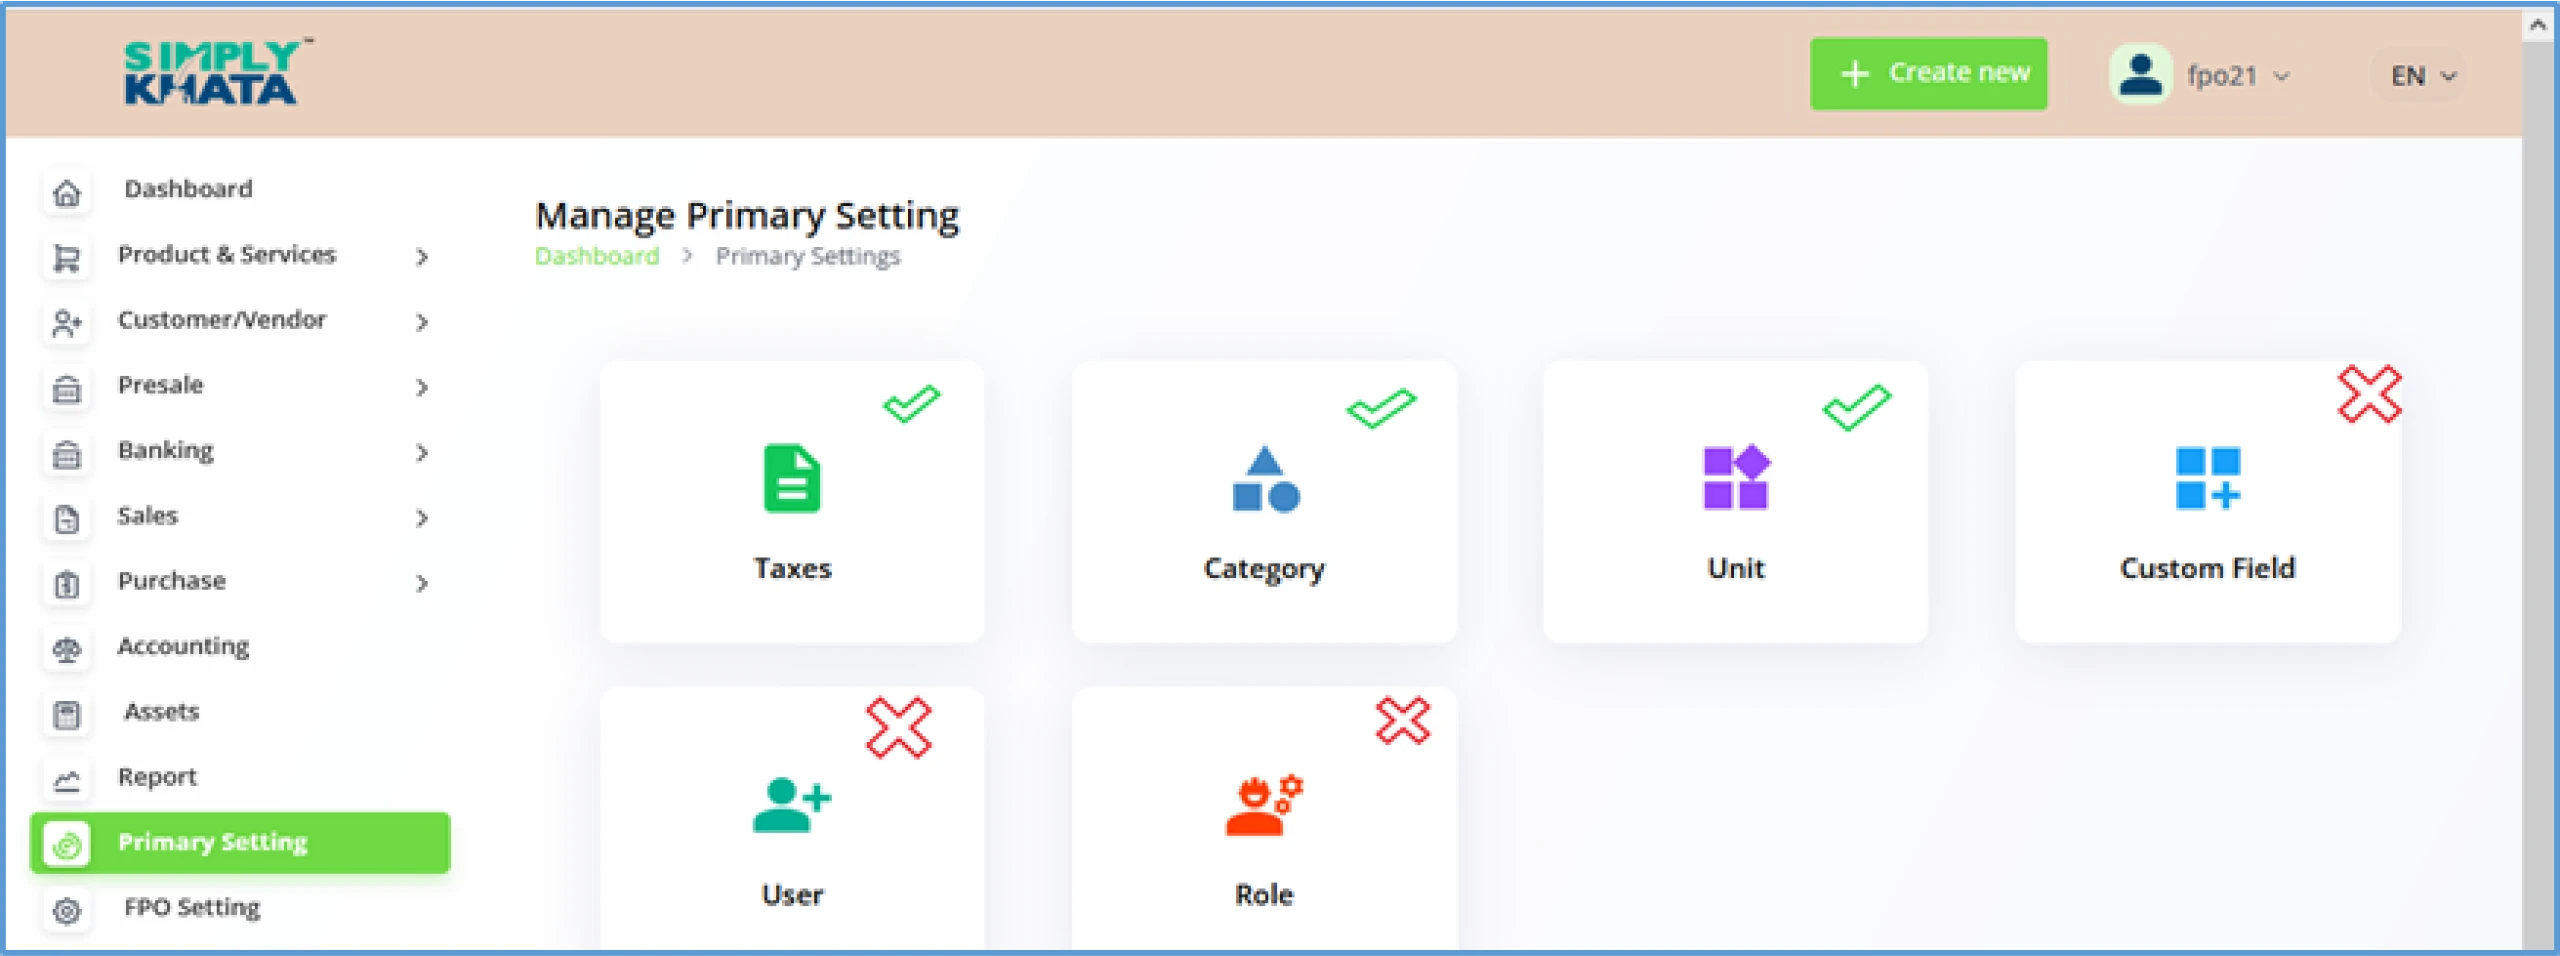
Image -15
There are 6 sub settings in the FPO setting option
- Taxes
- Category
- Unit
- Custom Field (Keep Default No change required)
- User (Keep Default No change required)
- Role (Keep Default No change required)
As shown in the Image ( 9 ), these settings are accessible by clicking the available respective icons in the grid. After clicking these Icons, the system will take you the respective setting page, which is available for making required changes in the system for customised use

(Image -9)
a. Taxes (Sub-Setting Entry 1st)
Click on the Primary Setting, and then click on Taxes, then go to a small “Plus” button Icon on right corner above search bar (As per Image 10), and then click the plus button to open new Create Tax Prompt as per (Image 11). Enter tax name in First field (Tax name can have number also so it is a good practice to add some numbers so that it can be remembered at the time of product creations for Ex. IGST12 signifies Indian GST @ 12%). The Rate in Numeric form in the Second field ( Do not add percentage sign ) and then click the create button, it will save the tax rate in the table below on the same page.

Image -10
b. Category (Sub-Setting Entry 2nd)
User can define multiple categories of Products, Income and Expenses for business requirements within the system subject to limitation of 200 entries. User can edit these entries also if required. However, it is a system suggestion that User create a new category if required. Click on the Primary Setting, and then click on Category (Categories are required to define the product Income and expenses in the system), then go to a small “Plus” button Icon on right corner above search bar (As per Image 12), and then click the plus button to open new Create Category as per (Image 13). Enter Category name in First field and then select category from dropdown. In this Dropdown, system has three options;
- Products and Services
- Income
- Expenses
System also gives colour options for all the three type of categories so that these categories come on the graph on the dashboard in an Identifiable manner

(Image -12)

Image -13
c. Unit (Sub-Setting Entry 3rd)
System also defines the Unit for the products and services which a FPO undertakes. For example if the FPOs is in the business of selling the Grains like Rice Wheat, Barley, Corn then the unit will be KGs. The FPO user can define multiple units as per the product of the FPOs. For accessing the Unit setting user need to Click on the Primary Setting, and then click on Unit then go to a small “Plus” button Icon on right corner above search bar (As per Image 14), and then click the plus button to open new Create Unit prompt as per (Image 15). Enter Unit name in field ( Only one field ) and then click green Create Button. This will create a unit and it will be available in the table on the same page. The units which are available on this page will also be needed for product creation. The defining the Unit is a critical setting for the system as all the product creation is not possible with the definition of the UNIT. Don not use long name for the Unit as it will be easy to see that at the time of creation of the Product.

Image -14

Image -11

Image -15
d. Custom Fields (Sub-Setting Entry 4th)
Keep Default No changes required
e. User (Sub-Setting Entry 5th)
Keep Default No changes required
f. Role (Sub-Setting Entry 6th)
Keep Default < Don’t change>
