FPO Setting
As every FPO is different and there are, certain prerequisites and customisation
required to be done before system usage for day-to-day activity. These settings
and customisation are available in the “FPO settings” and “Primary Setting” also
some of the settings are available in “Banking”.
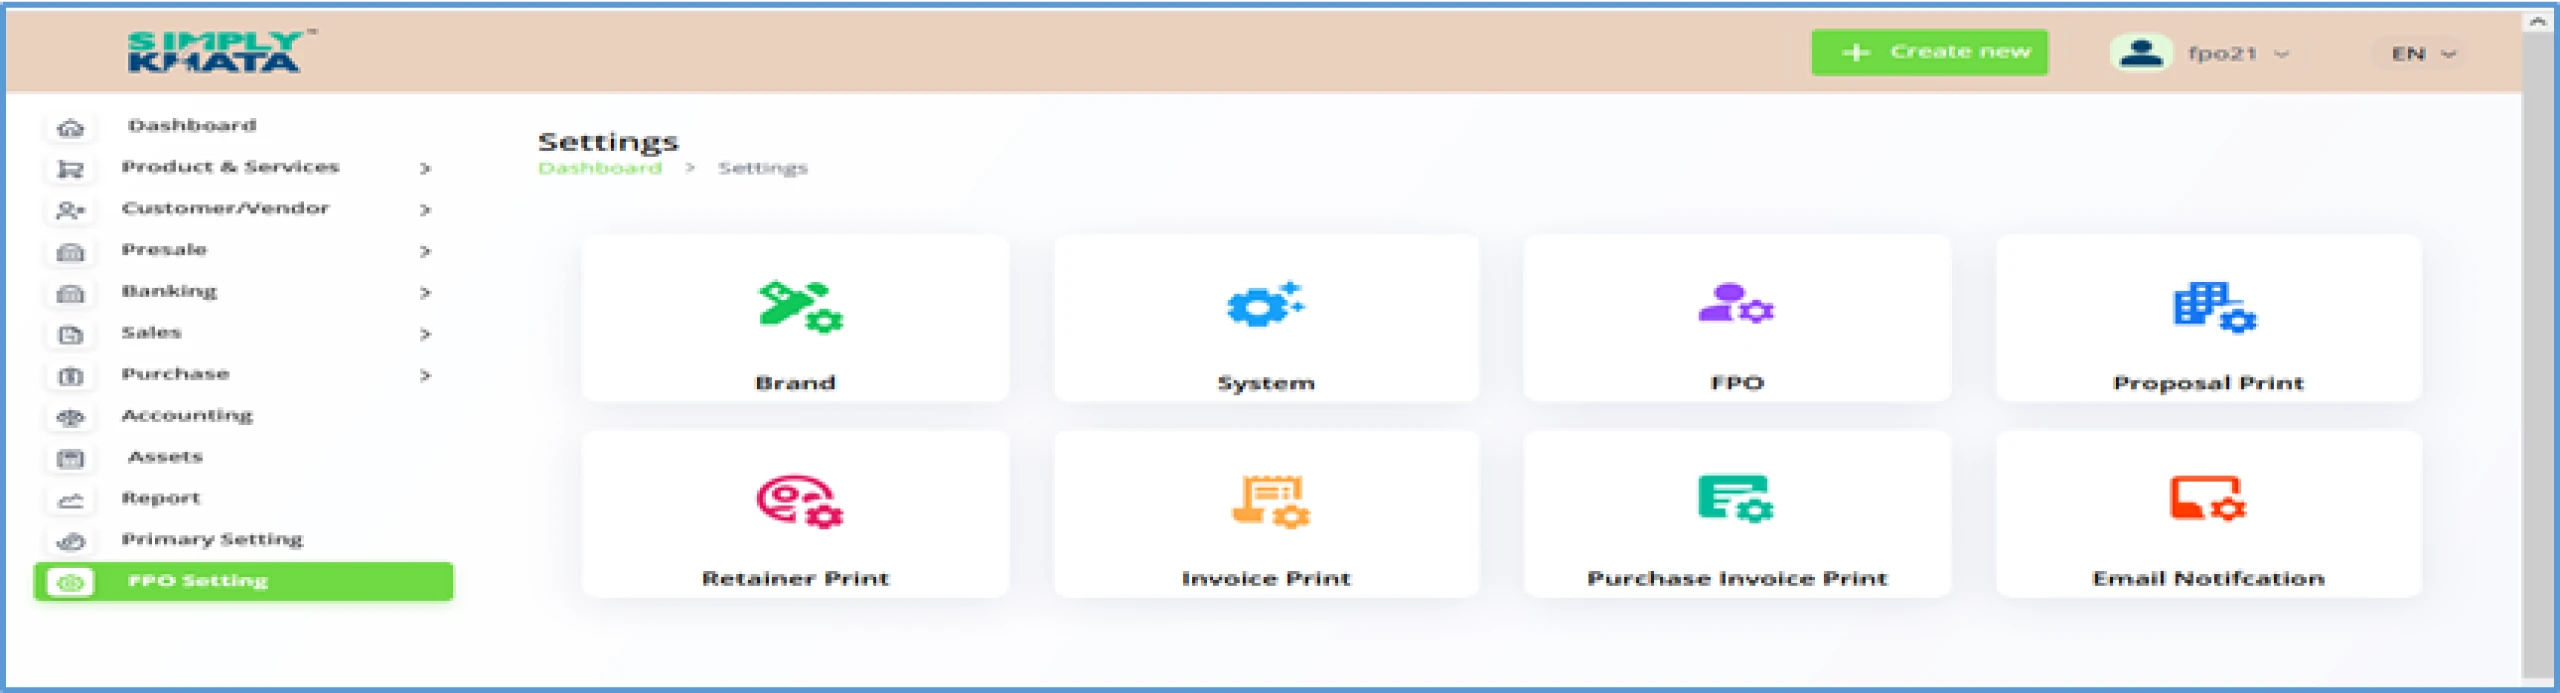
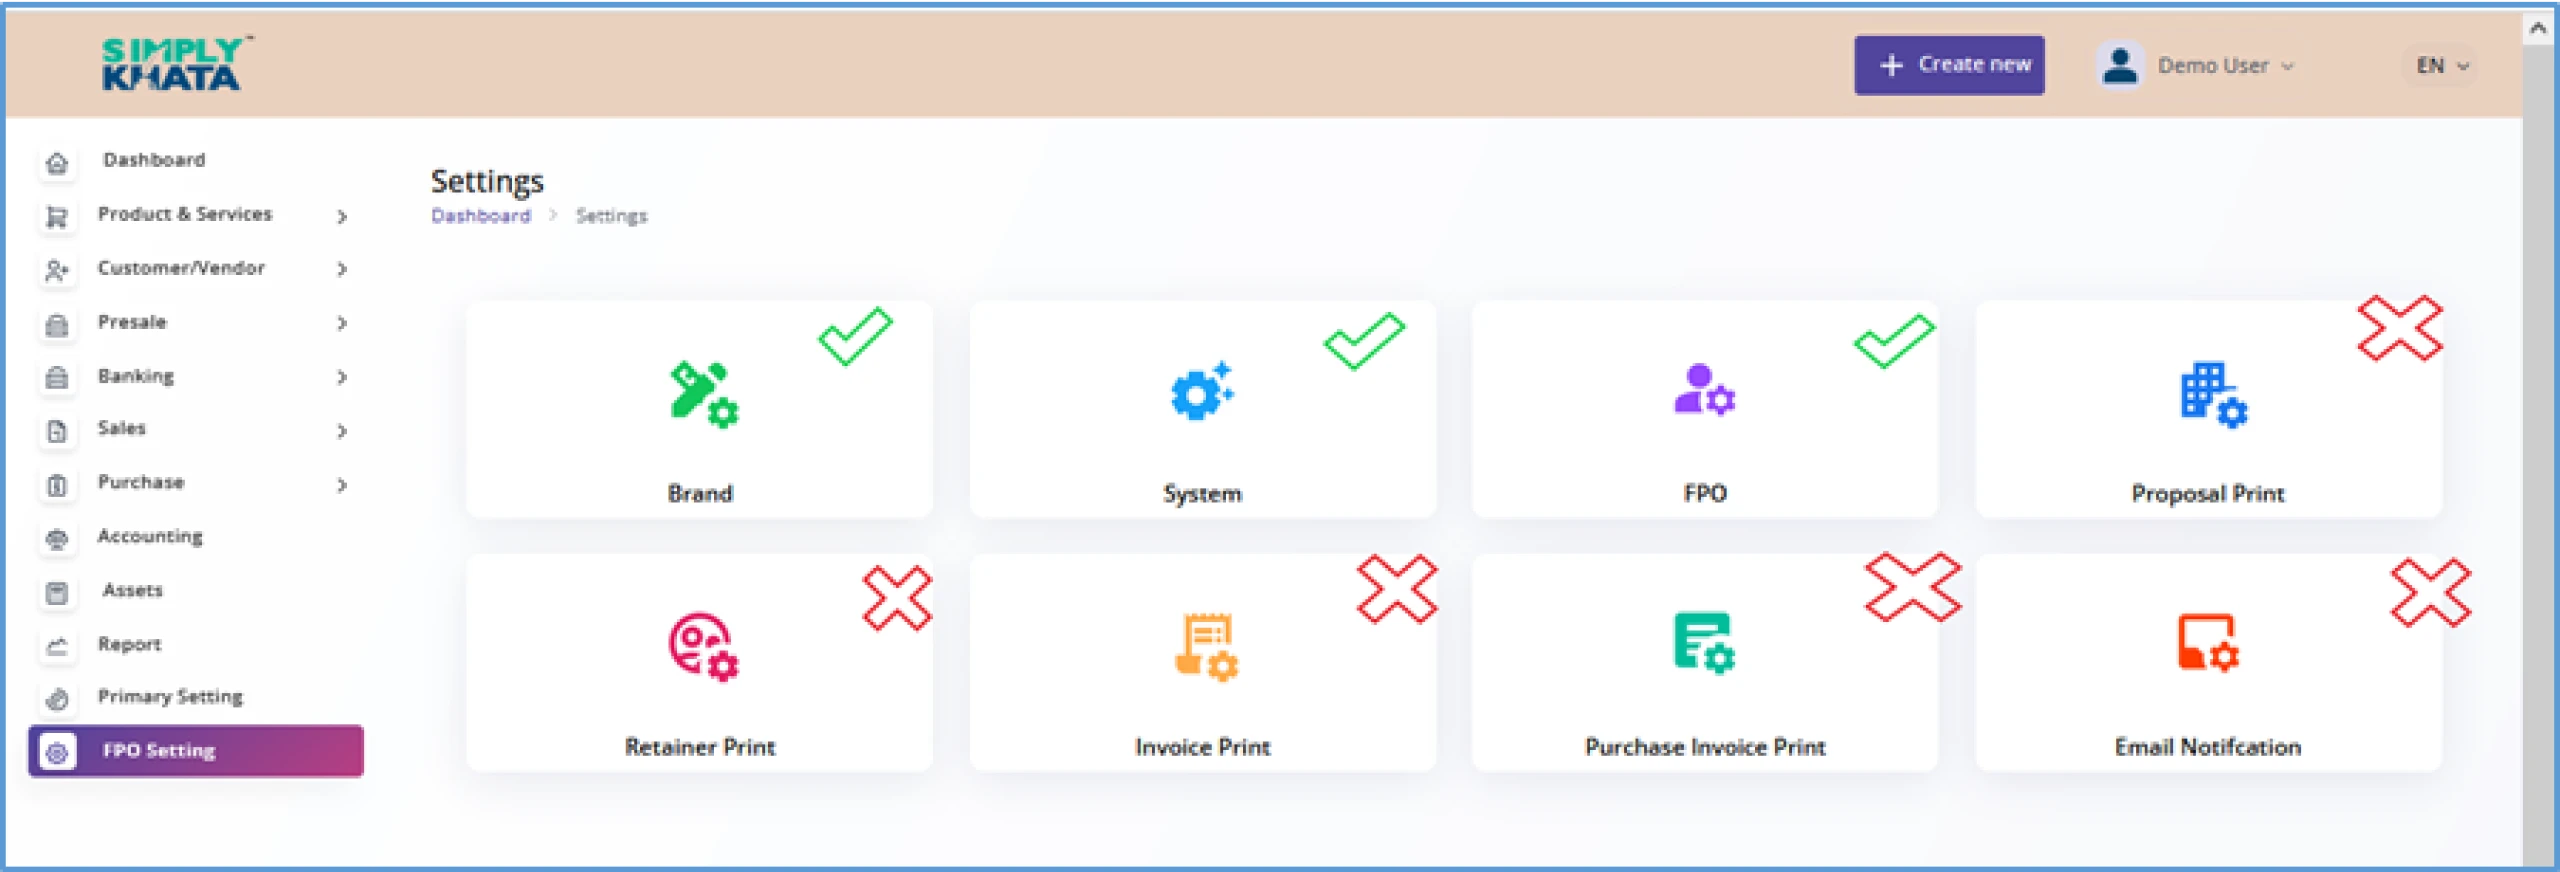
1 ) Side Navigation (Menu) > FPO Setting (Entry No 13)
- Brand
- System
- FPO
- Proposal Print ( Keep Default No change required )
- Retainer Print ( Keep Default No change required )
- Invoice Print ( Keep Default No change required )
- Purchase Invoice Print ( Keep Default No change required )
- Email Notification ( Keep Default No change required )
As shown in the Image (3) these settings can be accessed by clicking the
available icons in the grid. After clicking these Icons, the system will take you the
respective setting page, which is available for making required changes in the
system for customised use.
(Image -3)
a. Brand (Sub-Setting Entry 1st)
Click on the FPO Setting, and then click on Brand Icon, then go to
Theme customizer (As per Image 4), and then select the colour as
available from the options (4 options of Colours) and then save the change
and the colour will change for the dashboard.
Rest other setting on
this page should not be activated as they will result in errors in
the system.
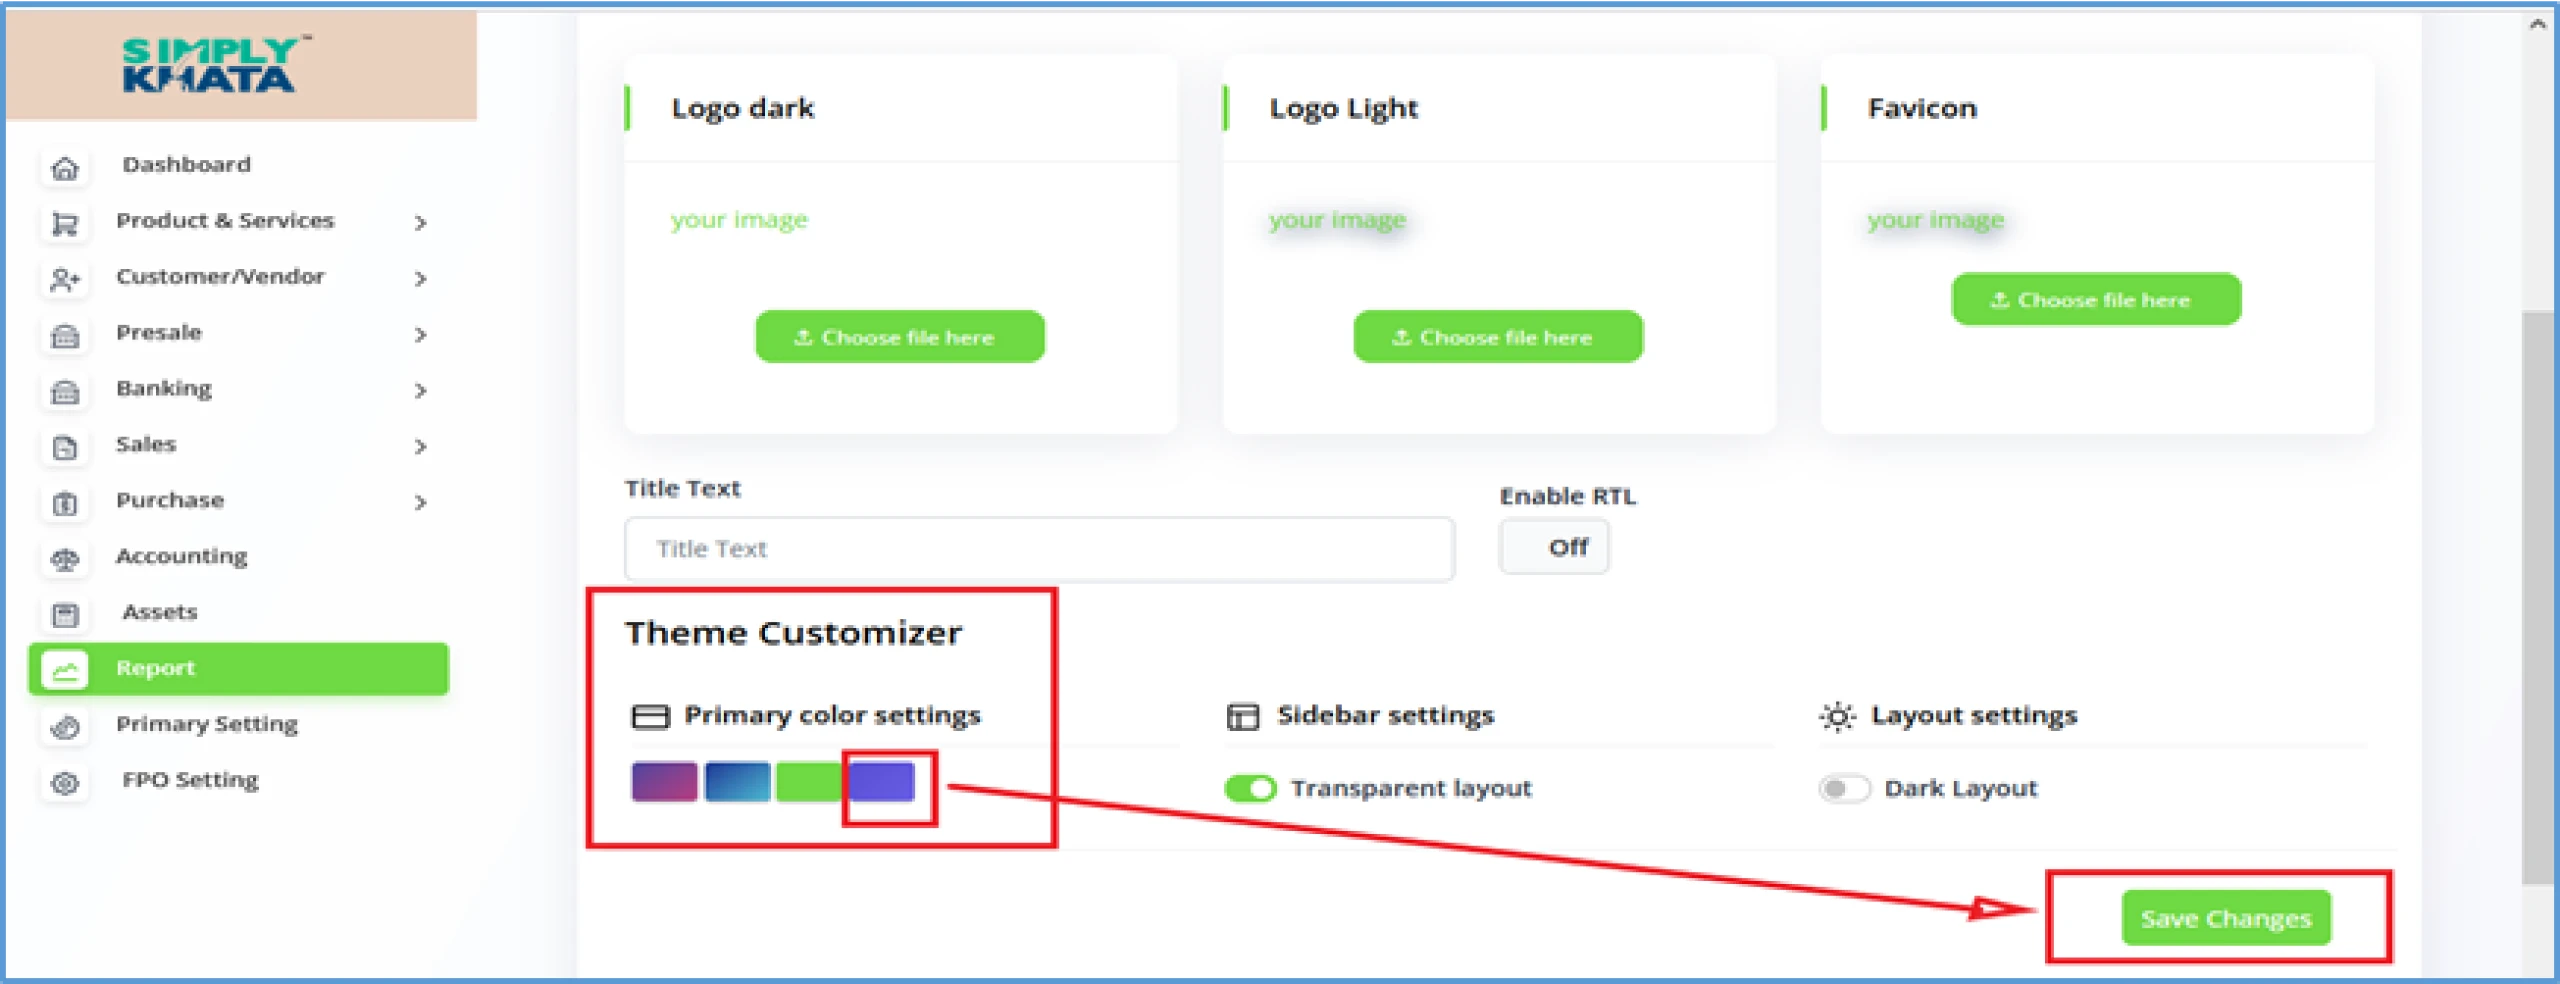
Image -4
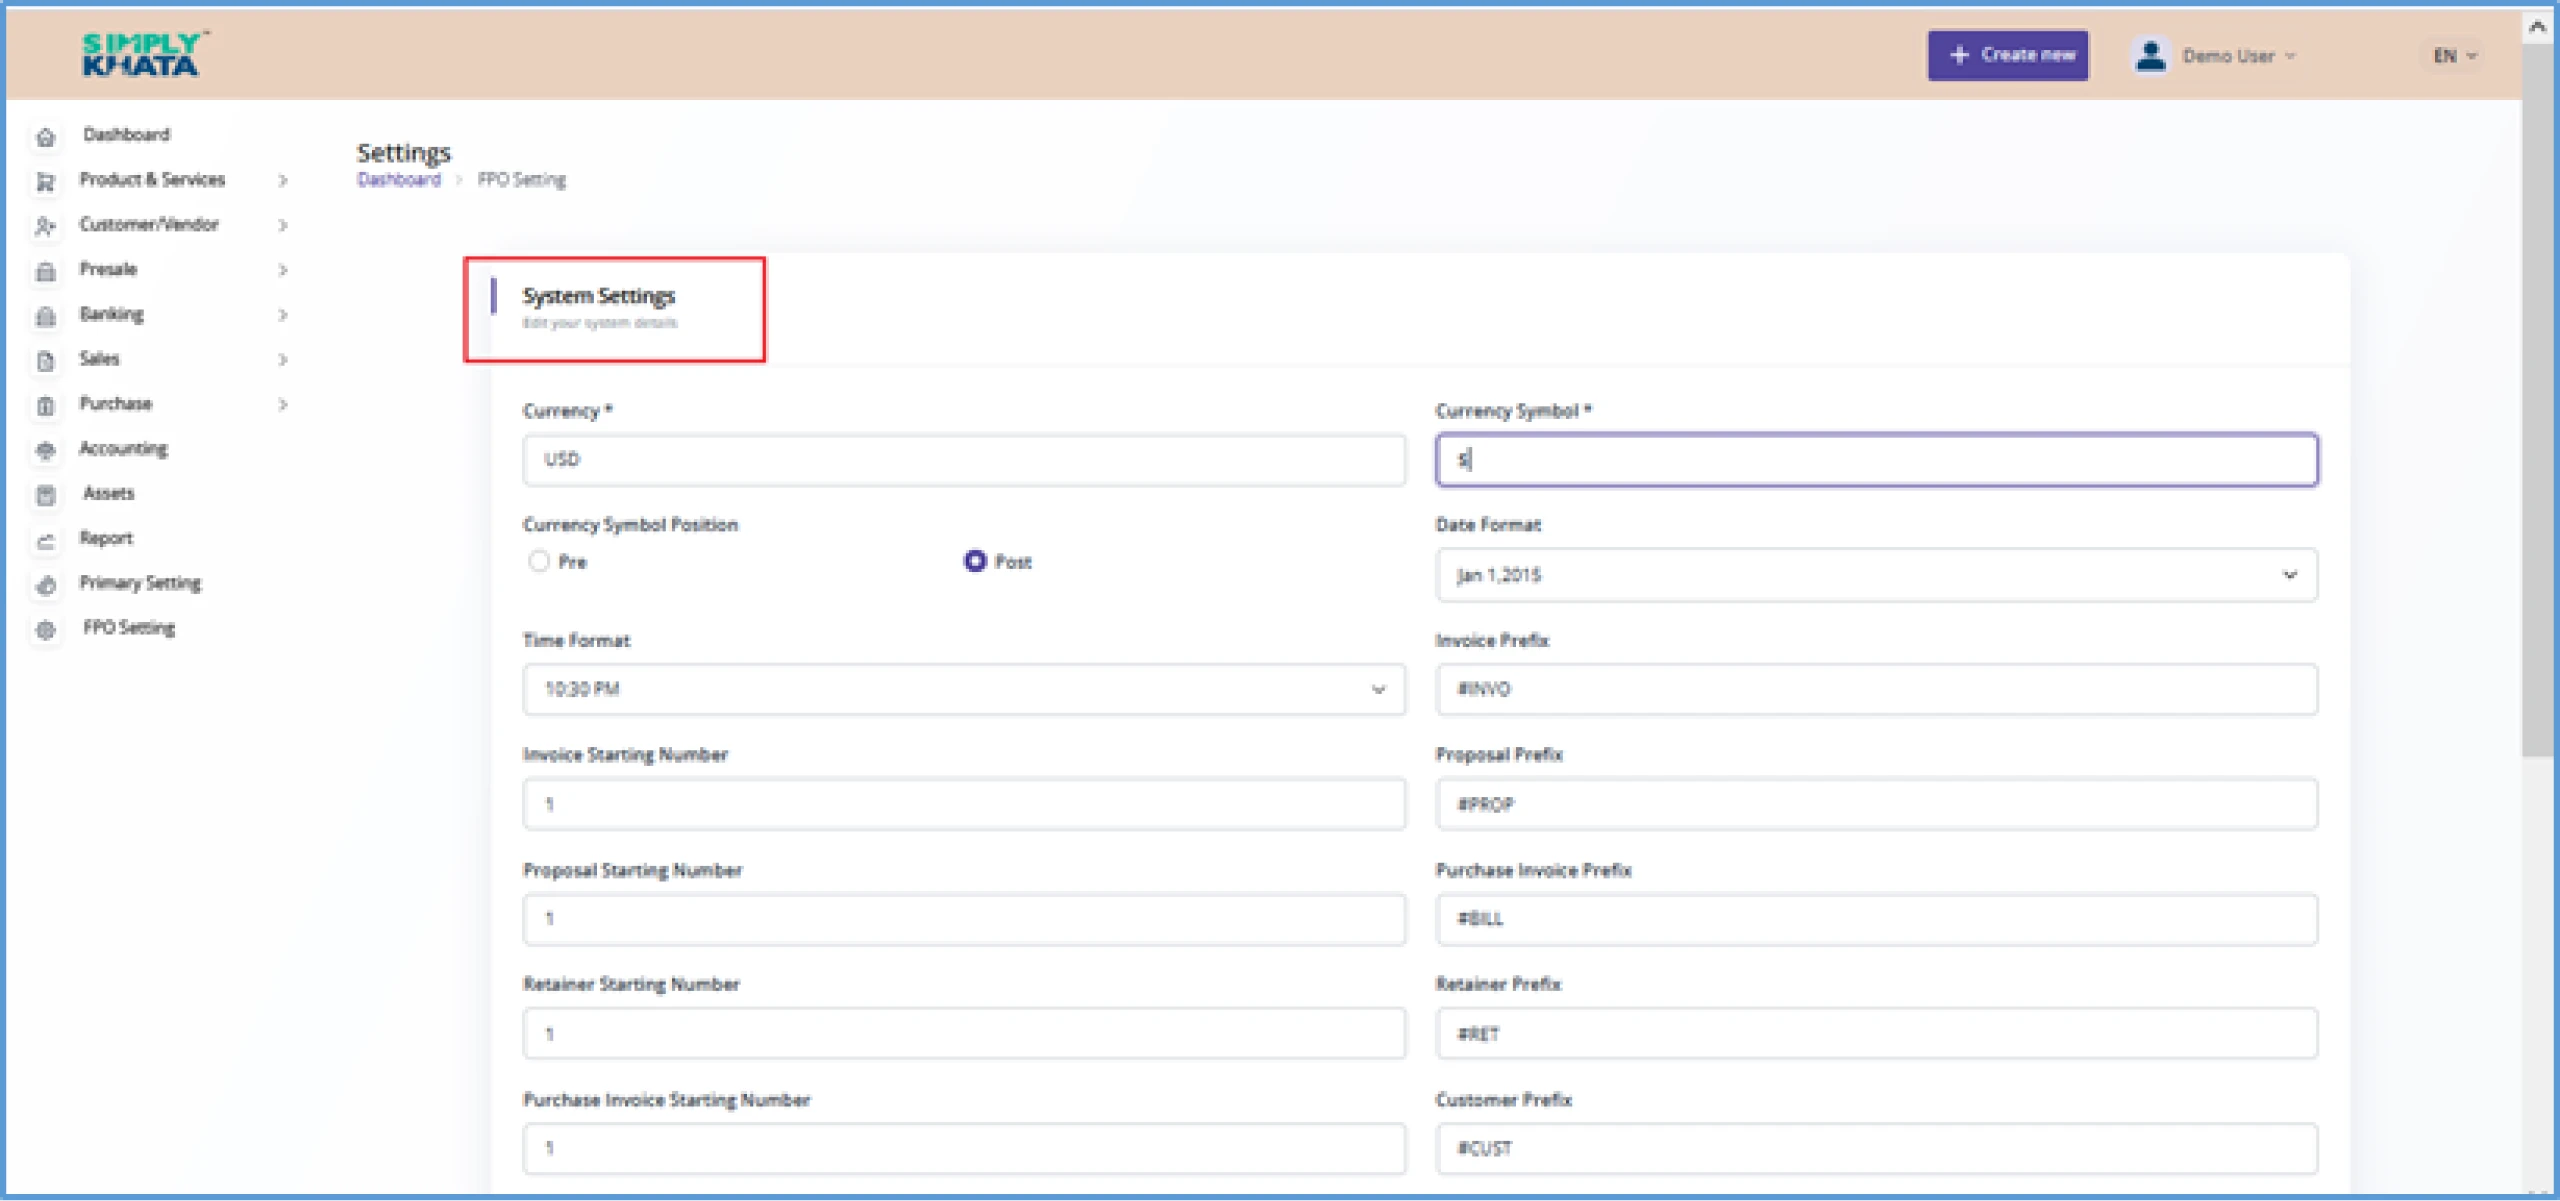
b. System (Sub-Setting Entry 2nd)
Click on the FPO Setting, and then click on System, then go to
respective fields and (As per Image 5,6), and then select the field as
available from the form field options
- Currency * > Change it to INR
- Currency Symbol > Change it to Blank
-
Currency Symbol Position > Pre or Post radio button
( This allows you
customise the currency symbol
appearance in the dashboard )
- Date Format > Don’t Change
- Time Format > Don’t Change
-
Invoice Prefix > Customise as per your need but # tag should be
there, Ideally don’t change
- Invoice Starting Number > Don’t Change
- Proposal Prefix > Don’t Change
- Proposal Starting Number > Don’t Change
-
Purchase Invoice Prefix > Customise as per your need but # tag
should be there, ideally Don’t Change.
-
Retainer Starting Number > Customise as per your need but # tag
should be there, ideally Don’t Change.
-
Retainer Prefix > Customise as per your need but # tag should be
there, ideally Don’t Change
.
- Purchase Invoice Starting Number > Don’t Change.
-
Customer Prefix > Customise as per your need but # tag should be
there, ideally Don’t Change
-
Vendor Prefix > Customise as per your need but # tag should be
there, ideally Don’t Change.
- Invoice/Purchase Invoice Footer Title > Don’t Change
-
Decimal Number Format > Currently two decimal places
Don’t Change
-
Journal Prefix > Customise as per your need but # tag should be
there, ideally do not change.
-
Display Shipping in Proposal / Invoice / Purchase Invoice >
Don’t Change
- Invoice/Purchase Invoice Footer > Don’t Change
After making relevant customisations, save the changes and then system
will show the notification of successful change.
(Image -5)

(Image -6)
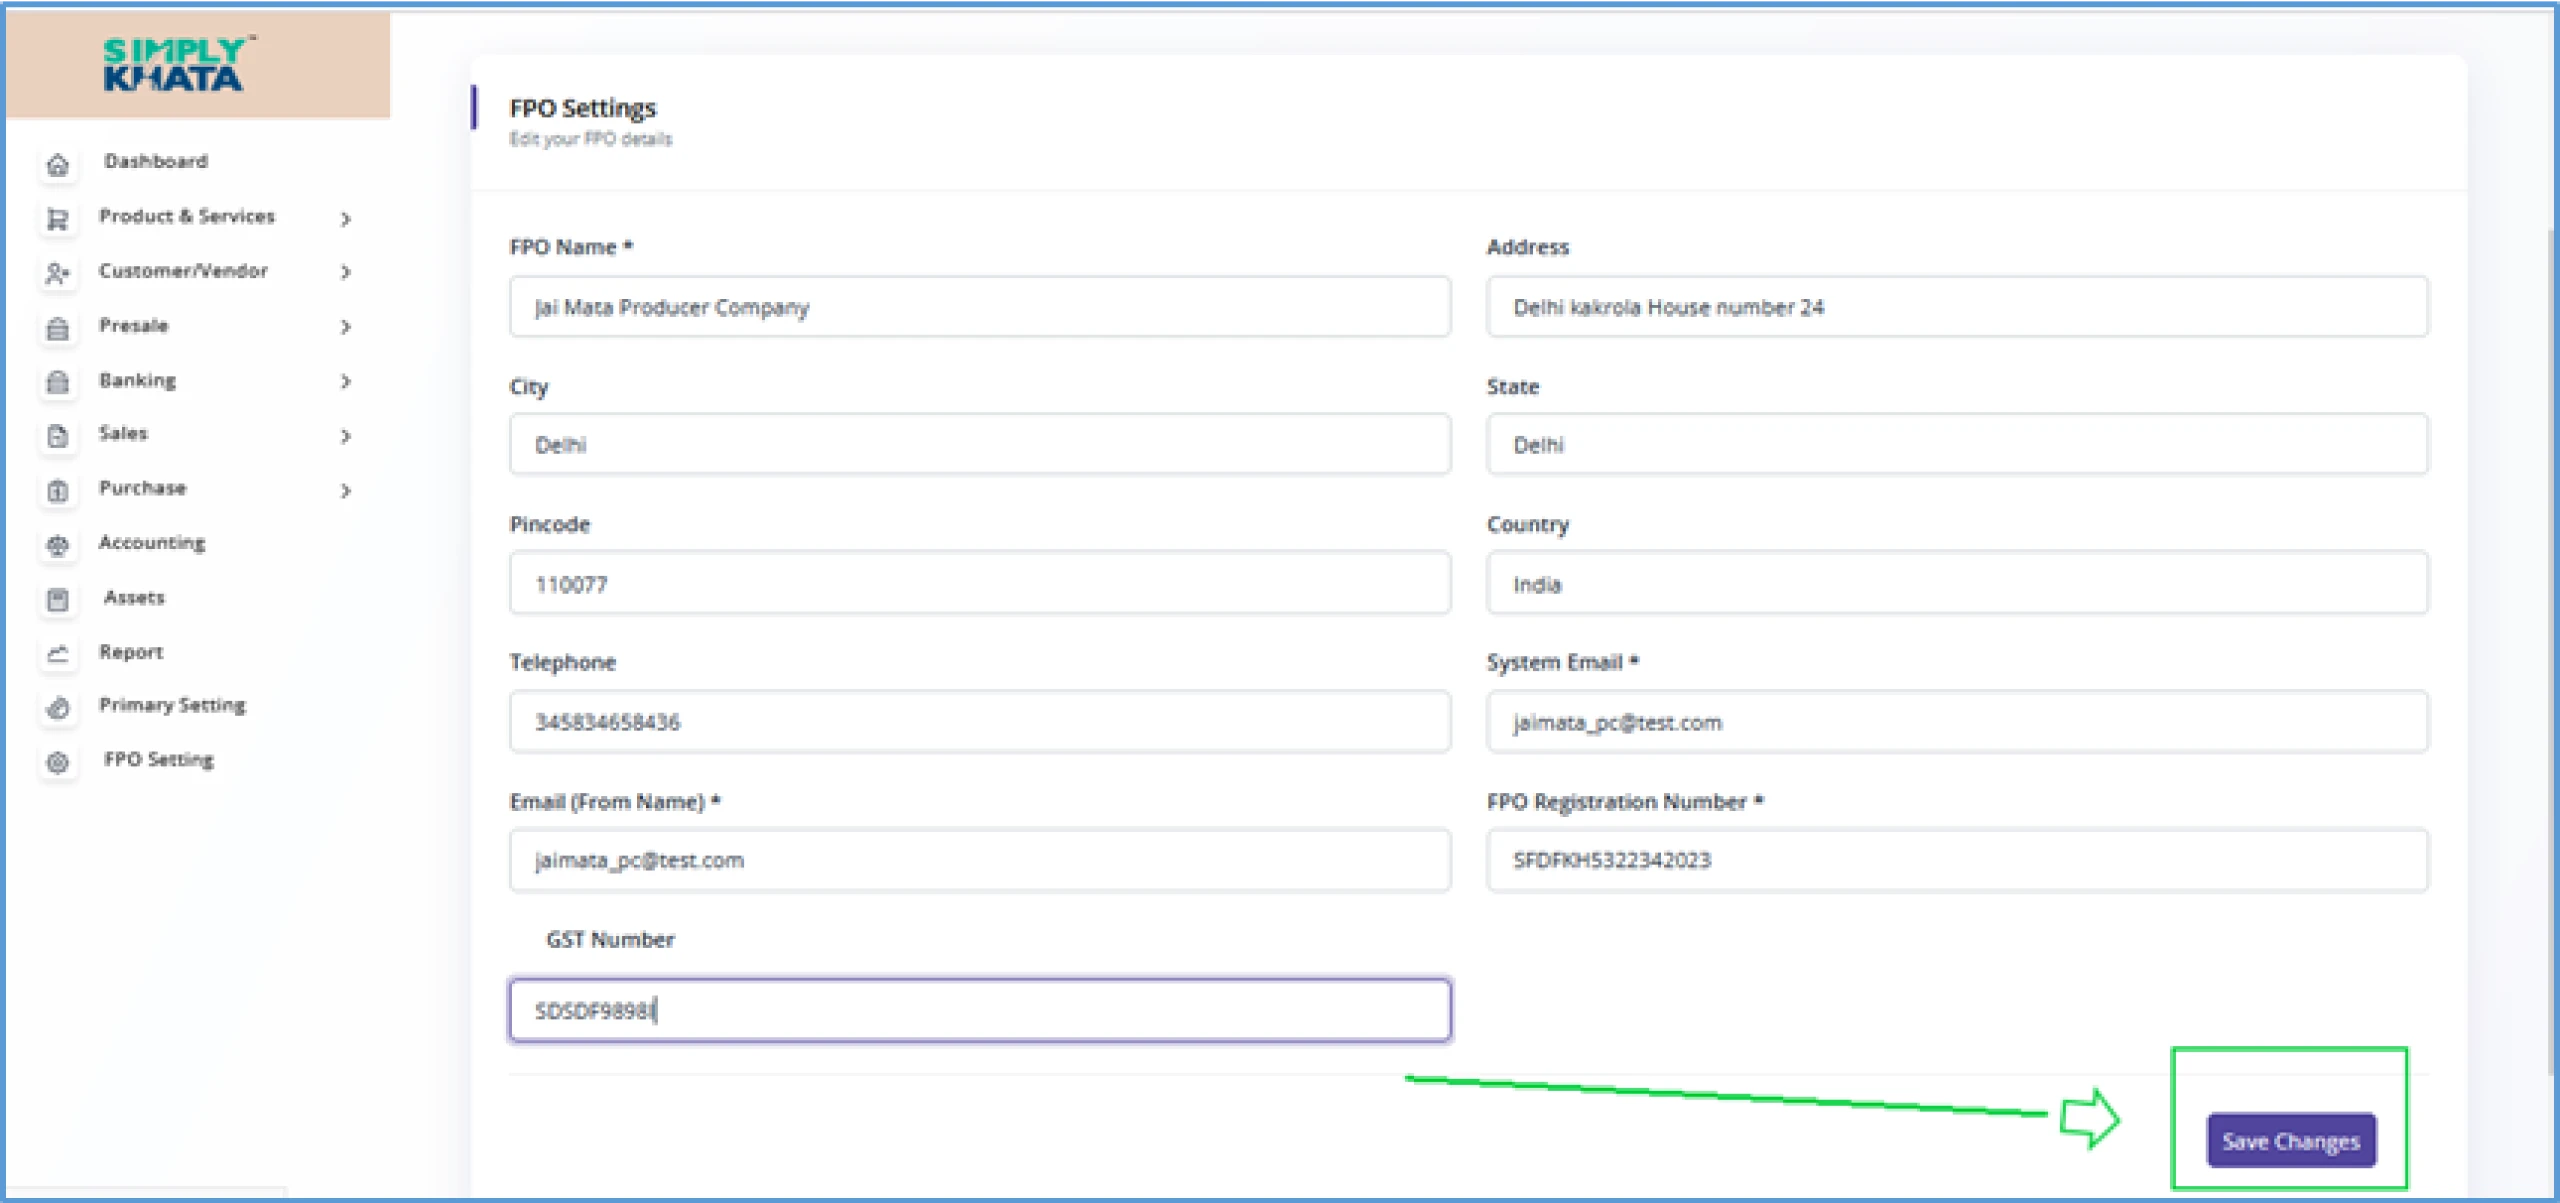
c. FPO (Sub-Setting Entry 3rd)
Click on the FPO Setting, and then click on FPO , then go to respective
fields and (As per Image 7), and then select the field as available from the
form field options from the FPO Settings user can fill the or Edit your FPO
details like
- FPO Name > Enter the name of the FPO
- Address > Enter the Address of the FPO
- City > Enter the operating city of the FPO (Only One required)
- State > Enter the operating state of the FPO (Only One required)
- Pin code > Enter the Address Pin code of the FPO (6 Digits)
- Country > Enter the Country as India for the FPO
- Telephone > Enter the contact number as available for the FPO
- System Email > Enter the mail as available for the FPO
-
Email (From Name) > Enter the mail as available for the FPO
( Same mail can be used for both options )
- FPO Registration Number > Enter the mail as available for the FPO
- GST/PAN Number > Enter the GST/PAN for the FPO
(Image -7)
d. Proposal Print (Sub-Setting Entry 4th)
Keep Default < Don’t change>As per Image 8
e. Retainer Print (Sub-Setting Entry 5th)
Keep Default < Don’t change>As per Image 8
f. Invoice Print (Sub-Setting Entry 6th)
Keep Default < Don’t change>As per Image 8
g. Purchase Invoice Print (Sub-Setting Entry 7th)
Keep Default < Don’t change>As per Image 8
h. Email Notification (Sub-Setting Entry 8th)
Keep Default < Don’t change>As per Image 8
(Image -8)
As every FPO is different and there are, certain prerequisites and customisation required to be done before system usage for day-to-day activity. These settings and customisation are available in the “FPO settings” and “Primary Setting” also some of the settings are available in “Banking”.
1 ) Side Navigation (Menu) > FPO Setting (Entry No 13)
- Brand
- System
- FPO
- Proposal Print ( Keep Default No change required )
- Retainer Print ( Keep Default No change required )
- Invoice Print ( Keep Default No change required )
- Purchase Invoice Print ( Keep Default No change required )
- Email Notification ( Keep Default No change required )
As shown in the Image (3) these settings can be accessed by clicking the available icons in the grid. After clicking these Icons, the system will take you the respective setting page, which is available for making required changes in the system for customised use.
(Image -3)
a. Brand (Sub-Setting Entry 1st)
Click on the FPO Setting, and then click on Brand Icon, then go to Theme customizer (As per Image 4), and then select the colour as available from the options (4 options of Colours) and then save the change and the colour will change for the dashboard. Rest other setting on this page should not be activated as they will result in errors in the system.
Image -4
b. System (Sub-Setting Entry 2nd)
Click on the FPO Setting, and then click on System, then go to respective fields and (As per Image 5,6), and then select the field as available from the form field options
- Currency * > Change it to INR
- Currency Symbol > Change it to Blank
- Currency Symbol Position > Pre or Post radio button ( This allows you customise the currency symbol appearance in the dashboard )
- Date Format > Don’t Change
- Time Format > Don’t Change
- Invoice Prefix > Customise as per your need but # tag should be there, Ideally don’t change
- Invoice Starting Number > Don’t Change
- Proposal Prefix > Don’t Change
- Proposal Starting Number > Don’t Change
- Purchase Invoice Prefix > Customise as per your need but # tag should be there, ideally Don’t Change.
- Retainer Starting Number > Customise as per your need but # tag should be there, ideally Don’t Change.
- Retainer Prefix > Customise as per your need but # tag should be there, ideally Don’t Change .
- Purchase Invoice Starting Number > Don’t Change.
- Customer Prefix > Customise as per your need but # tag should be there, ideally Don’t Change
- Vendor Prefix > Customise as per your need but # tag should be there, ideally Don’t Change.
- Invoice/Purchase Invoice Footer Title > Don’t Change
- Decimal Number Format > Currently two decimal places Don’t Change
- Journal Prefix > Customise as per your need but # tag should be there, ideally do not change.
- Display Shipping in Proposal / Invoice / Purchase Invoice > Don’t Change
- Invoice/Purchase Invoice Footer > Don’t Change
After making relevant customisations, save the changes and then system will show the notification of successful change.
(Image -5)
(Image -6)
c. FPO (Sub-Setting Entry 3rd)
Click on the FPO Setting, and then click on FPO , then go to respective fields and (As per Image 7), and then select the field as available from the form field options from the FPO Settings user can fill the or Edit your FPO details like
- FPO Name > Enter the name of the FPO
- Address > Enter the Address of the FPO
- City > Enter the operating city of the FPO (Only One required)
- State > Enter the operating state of the FPO (Only One required)
- Pin code > Enter the Address Pin code of the FPO (6 Digits)
- Country > Enter the Country as India for the FPO
- Telephone > Enter the contact number as available for the FPO
- System Email > Enter the mail as available for the FPO
- Email (From Name) > Enter the mail as available for the FPO ( Same mail can be used for both options )
- FPO Registration Number > Enter the mail as available for the FPO
- GST/PAN Number > Enter the GST/PAN for the FPO
(Image -7)
d. Proposal Print (Sub-Setting Entry 4th)
Keep Default < Don’t change>As per Image 8
e. Retainer Print (Sub-Setting Entry 5th)
Keep Default < Don’t change>As per Image 8
f. Invoice Print (Sub-Setting Entry 6th)
Keep Default < Don’t change>As per Image 8
g. Purchase Invoice Print (Sub-Setting Entry 7th)
Keep Default < Don’t change>As per Image 8
h. Email Notification (Sub-Setting Entry 8th)
Keep Default < Don’t change>As per Image 8